POP2 - PUTV 3D Models Showcase Progress & Tips

So did anybody tried Cloud Compare yet ?
I made pure experiment today , not cleaning the point cloud at all and just meshed it in Cloud Compare , the figurine is around 40mm tall / 1 and half inch
results was really awesome in comparison with Revo Scan meshing .

Found out that Cloudcompare level 8 is Revo Studio level 4 ( meshing ) and the results between the both software was almost the same for the not cleaned point cloud
However with CloudCompare I can do greater noise level cleaning without affecting the overall mesh structure too much , especially if your point cloud got overlapped for some reason , it can clean this issues very well .

10 times lower mesh with the same details

Close up comparison

Lots of Artifacts in Revo Scan , I believe it is a bug because Handy Scan 4 never do that.
The point cloud is scanned excellent in Revo Scan but then the fusing messing something up, so if you encounter any issues it is definitely not the device that need to be calibrated .

Here is comparison between Revo Scan fused Point Cloud and Cleaned in Cloud Compare
left is CC and right RS

At least we know that is it not the device problem , and software can be always updated

9 Likes

Testing out the new Windows Revo Scan , please make sure you update your old version. It works wonderfully .

I just scanned a 30mm little plastic horse prepared with 3D paint Spray, its legs are just 2mm but I was able to pick it up and scan it .

\

Also you know what it is ? I just touched the wet paint on the horse too early , you can see my finger smudge picked up by the scanner.

Overall less noise , better point cloud fussing , I think we got a winner here today ! I can now say bye to HandyScan for good …

More Uniform Point Cloud fusing

New Pitch Point settings , Auto and Manual ( Auto is recommendation , works great )

New Meshing settings Auto and Manual ( auto is recommendation based on point cloud and size of the object )

I overscanned the horse like 10 times on purpose to see how it gonna fuse it , and it did great job and much faster .

2 Likes

Wow I could scan today just simple mug without markers with the new software , also I got deeper into the color indicator under the new Depth Camera preview

So the RED indicate the max of GAIN you can have before it will not scan correctly
If is BLUE means it is too low gain ( too dark ) the full gray scale of the object is the perfection in the settings.

5 Likes

Forgot to add the scanned mug, everything on AUTO pilot … no custom settings
I used Face mode for the mug because the feature mode is too small for a mug and you want it to be as much visible in the Depth Cam preview, no partials .

3 Likes

Also got myself a new markers , very reflective , picking up great on an angle , I wanted to add it to POP2 plate when scanning smaller less featured objects as the middle is almost empty
it is on sale today USA, it is 6mm and works super good

Look the original markers from the plate did not pick up at all at that angle, compared to the new reflective one . I just throw in for a preview , it stick also like crazy to a smooth surface hard to get off.

2 Likes

Some great examples, @PUTV. I got my POP2 today, so still learning how to use it, but trying to figure out why my results are so radically different to yours. I can barely get anything to scan 300 frames without it unaligning at some point during the spin. My captures are also much messier and include things like the background PVC sheet I’ve set up to avoid noise, and the tracking dots on the turntable.

Using mostly default settings (High accuracy, Features, No Color/colorful).

Hoping once I learn a bit more I can get results as good as yours.

1 Like

Hi @brizz , thanks ! from what you saying it looks like your gain settings are not proper , the slider under Depth Camera preview , the new upgrade yesterday is semi automatic , no more guessing if you don’t know what to do in the beginning , please make sure you have the last version Windows/Revo Scan , upgrade from April/19/22
it fixed most issues I had with it for now

Make sure your scanned object has as little blue and as little red as possible in the preview window under Depth Camera , this is a key to a proper capture of your point cloud data , also choice proper the modes for your objects , face and head mode fit mostly everyday objects , how simpler the object how less accuracy it needs, anything below 5 inches is good to use with Feature mode already as this mode is created for scanning mini objects , for example you want to scan an orange with feature mode due to details of the skin , but an apple can be scanned with head mode , a simple vase can be scanned with low accuracy , low accuracy means less features not low quality scan , so choose wisely !
Good luck and practice practice practice !

What turntable are you using ? I’m seeing some chinese ones but they only turn 40 sec. per rotation.
Thanks !

@roger2005 the original POP2 is 30 sec per rotation , I am using now 20 sec per rotation but not in all cases . Sometimes I use 30 sec, sometimes 40 sec, it depends on what I am scanning . If the object has less features it is better to slow it down . I also have turntable with 10 sec but it is smaller , it is hard to find a 11 + inches turntable with faster motor than 20 sec per rotation .

Right now I use this one for most all my work , from full body scanning to small objects

I posted above the link many times already but here it is again
if it is out of stock , there are a lot of them under different names , they all are the same , 20sec-60sec with remote control . Lots of functions also for photogrammetry every second manual step by step rotation , automatic step by step angle rotation , half degree rotation , manual stop forward, lots of functions .

2 Likes

sorry i could have looked deeper, many thanks !

1 Like

Here my 3D renders of the scanned objects from yesterday , food assets in making again …

Head mode
High Accuracy
Auto settings

Point Cloud

Point cloud

3D render of the scanned objects

9 Likes

if you have tutorual for experiment… il here :smiley: i really don’t know how to work in that program so it would be ok to see some instructions if you have how you did it

Yes let do it, you mean Cloudcompare ? yes very good and easy to use software, I developed already mini workflow for fast editing .
Let me put it down for you quickly , brb !

1 Like

So you decide to scan some stuff , and want it to be perfect then you scan it over and over around many times for the best textures or whatever you think you are doing .
Then after you fused your point cloud in Revo Scan you got this


not much to thinking about you decided to mesh this fluffy monster hoping for the best
and then after enormous waste of time waiting you got this

Asking yourself, do I need to calibrate my device or what is wrong with it ?
Well my dear friend , you over scanned it too much with so much data that can’t be properly processed by the point fusion process . Not even Revo Studio will help you here , this monster is so huge, you can’t even share it online , your computer is about to crash from a lack of memory , pssst… it will be your little secret forever , buddy you failed …since there is one rule in 3D scanning , as good is your point cloud , as good will be your mesh ! and you can’t make a better mesh than the point cloud you produced , each time you process it getting worse and worse , in short, garbage in, garbage out … and you are fully responsible for it , like it or not

but there is a little helper that can clean your mess , it may not work 100% every time but in mostly 95% cases it always works, so what to do?

Get yourself a free Cloud Compare software , works with Win and Mac
Open the messy point cloud from your project files ( not the mesh) using. Cloud Compare

  1. Once you load your messy point cloud the first step you want to do is SOR filter , it will remove all loose point clouds that do not belong or were not fused properly in short the extra frames that messed up your object .
    After loading select the point cloud

  2. Now go to the menu bar and look for Tools/Clean/SOR filter click

  1. After that you will see small window open , follow the screen for settings click ok

  1. Now you see all the nasty frames left over is gone , look less fluffy on the edges

  1. Now you got a new copy of your cloud point with an extension name Cloud clean, forgot about the other original point cloud select now the new point cloud and go back to the Tools/Clean/Noises , click the noises and follow the settings


6.Now the noises are clean , and you got new cloud point with the extension Cloud.clean.clean you are ready now for meshing
Screenshot 2022-04-21 142540

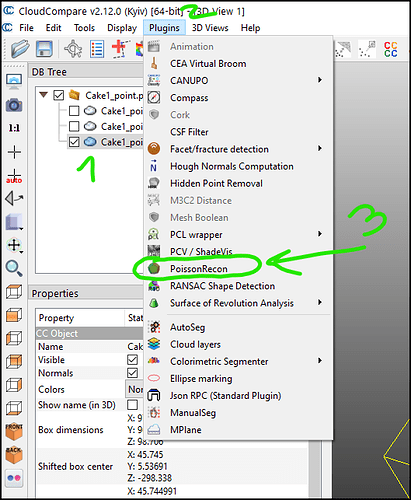
  1. Now when the new clean clean point cloud is selected go to menu bar and click Plugin / PoissonRecon windows will open

  2. In the new window set the settings exactly , level 8 will give you regular mesh density , I usually use between 8 to max 10 , it depends how much features has your model , for a Vase I would use 8 , for a face I would use 9-10 max you can always create new mesh again if something looks not right or too many noises , higher level can create extra micro noises .
    The output density as SF is optional but if your model has no bottom I would recommend to use it
    please start from lower levels , level 8 can take a long time if your object has lots of features , go low with 8 and if needed increase the level by making new mesh .

Screenshot 2022-04-21 144356

  1. 10 hours later … Just kidding , now you got your mesh created and so much cleaner but then why do I see the funky colors ? well look for the next step .

look at this clean mesh , no more clumps and noises … now we going to fix the rest

  1. Now you need to remove that extra mesh that was generated if you scan has no bottom under the SF Parameters

The colors indicate the density of the point cloud , be careful if you have some holes in your scanned object as you may open them again if you slide it too high

  1. if your objects did not had any holes or was with bottom , you will be good to go now and can export your mesh , before that you need to change the color from SF to RGB here

  2. but if your model did not had any bottom like my CAKE I need to generate new mesh from it now by going to Menu Bar /Edit/Scalar Fields/Filter by Value

  3. Click Export and you mesh is ready for save
    Screenshot 2022-04-21 145743

  4. Now you got yourself a new mesh , change the color from SF to RGB or Nothing if your scan has no color data and you ready to save your new mesh out , you can also export your clean point cloud and replace it with the messy one in your projects

all your mesh details are preserved


and look at this before night mare

I hope next time I do video will be much quicker and less talk , as I do not talk in my video tutorials, just going straight to action which will cost you less time than reading this tutor.

I hope you like it ! leave me :blue_heart: if you do , and if you have any question let me know.

Enjoy cleaning your messes :joy:
PUTV

26 Likes

I tested the new reflective markers , surprise ! the original markers on the revomplate do not even show up when the gain is set to lowest , the only visible markers are the reflective one I added to the plate , I may cover all of the original one with the new one , they can reflect well the Infrared light back on any angles.

now look how much gain level I need to show the original markers ? now I guess I know why marker mode not always works for many of you .

I got myself another 2x200 for $6.99 each

Perfect scan , all on automatic suggestion , new markers mode
covered the old one with the new reflective one

Test

without markers in feature mode

2 Likes

Scan for today
a ring, a very small ring the base eye is just 10 mm , leaves 5mm
Feature Mode
I put the ring on a rolled towel paper as a support for the ring so POP2 pick it up, then extracted the ring from the scan, cleaned up and rendered .

5 Likes

This is an impressively-detailed tutorial.

Thank you.

1 Like

Thx a lot… a gonna test, looks like Great program!!!

1 Like

Thank you Jeff , and best wishes for successfully completing another trip around the sun ! enjoy your special day !

1 Like