[Tutorial] How to use Cloud Compare to clean up your messy point cloud/scan data

Hi Everyone , I posted it in my showcase thread , but maybe a good idea for everyone to find it here in in case you need it.

You can download free software here Win/Mac CLOUD COMPARE

So you decide to scan some stuff , and want it to be perfect then you scan it over and over around many times for the best textures or whatever you think you are doing .
Then after you fused your point cloud in Revo Scan you got this


not much to thinking about you decided to mesh this fluffy monster hoping for the best
and then after enormous waste of time waiting you got this

Asking yourself, do I need to calibrate my device or what is wrong with it ?
Well my dear friend , you over scanned it too much with so much data that can’t be properly processed by the point fusion process . Not even Revo Studio will help you here , this monster is so huge, you can’t even share it online , your computer is about to crash from a lack of memory , pssst… it will be your little secret forever , buddy you failed …since there is one rule in 3D scanning , as good is your point cloud , as good will be your mesh ! and you can’t make a better mesh than the point cloud you produced , each time you process it getting worse and worse , in short, garbage in, garbage out … and you are fully responsible for it , like it or not

but there is a little helper that can clean your mess , it may not work 100% every time but in mostly 95% cases it always works, so what to do?

Get yourself a free Cloud Compare software , works with Win and Mac
Open the messy point cloud from your project files ( not the mesh) using. Cloud Compare

  1. Once you load your messy point cloud the first step you want to do is SOR filter , it will remove all loose point clouds that do not belong or were not fused properly in short the extra frames that messed up your object .
    After loading select the point cloud

  2. Now go to the menu bar and look for Tools/Clean/SOR filter click

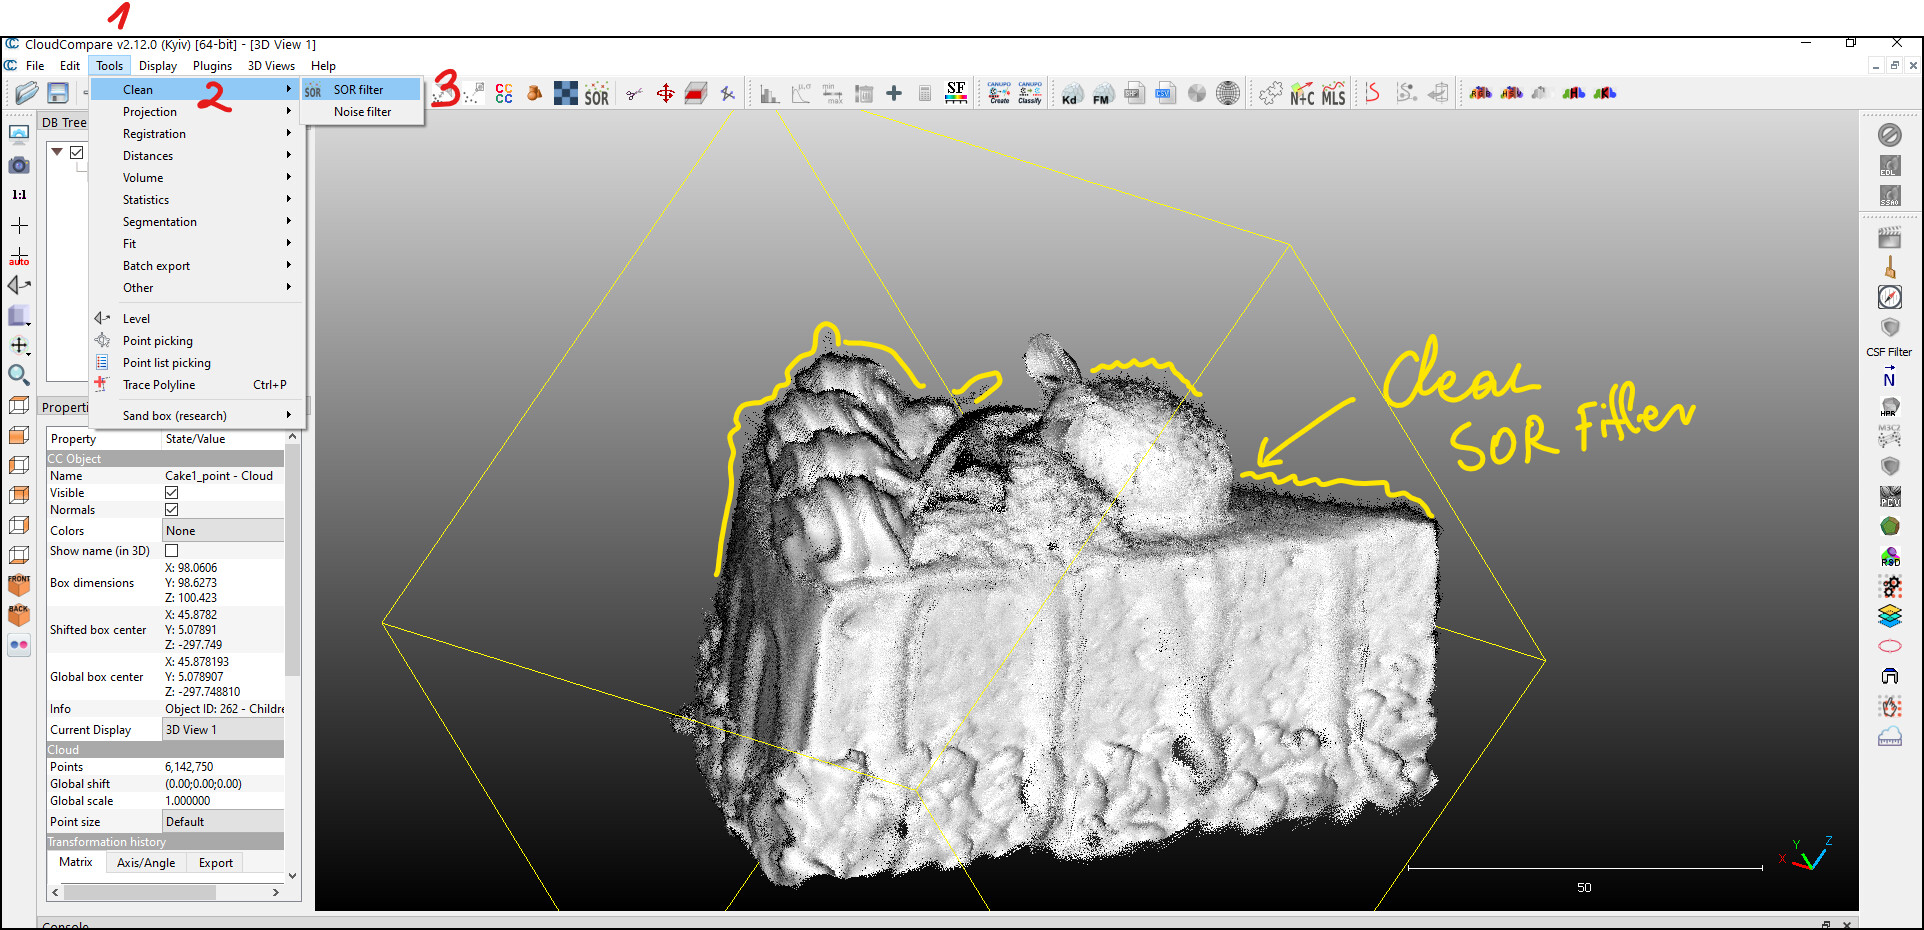
  1. After that you will see small window open , follow the screen for settings click ok

  1. Now you see all the nasty frames left over is gone , look less fluffy on the edges

  1. Now you got a new copy of your cloud point with an extension name Cloud clean, forgot about the other original point cloud select now the new point cloud and go back to the Tools/Clean/Noises , click the noises and follow the settings


6.Now the noises are clean , and you got new cloud point with the extension Cloud.clean.clean you are ready now for meshing
Screenshot 2022-04-21 142540

  1. Now when the new clean clean point cloud is selected go to menu bar and click Plugin / PoissonRecon windows will open

  2. In the new window set the settings exactly , level 8 will give you regular mesh density , I usually use between 8 to max 10 , it depends how much features has your model , for a Vase I would use 8 , for a face I would use 9-10 max you can always create new mesh again if something looks not right or too many noises , higher level can create extra micro noises .
    The output density as SF is optional but if your model has no bottom I would recommend to use it
    please start from lower levels , level 8 can take a long time if your object has lots of features , go low with 8 and if needed increase the level by making new mesh .

Screenshot 2022-04-21 144356

  1. 10 hours later … Just kidding , now you got your mesh created and so much cleaner but then why do I see the funky colors ? well look for the next step .

look at this clean mesh , no more clumps and noises … now we going to fix the rest

  1. Now you need to remove that extra mesh that was generated if you scan has no bottom under the SF Parameters

The colors indicate the density of the point cloud , be careful if you have some holes in your scanned object as you may open them again if you slide it too high

  1. if your objects did not had any holes or was with bottom , you will be good to go now and can export your mesh , before that you need to change the color from SF to RGB here

  2. but if your model did not had any bottom like my CAKE I need to generate new mesh from it now by going to Menu Bar /Edit/Scalar Fields/Filter by Value

  3. Click Export and you mesh is ready for save
    Screenshot 2022-04-21 145743

  4. Now you got yourself a new mesh , change the color from SF to RGB or Nothing if your scan has no color data and you ready to save your new mesh out , you can also export your clean point cloud and replace it with the messy one in your projects

all your mesh details are preserved


and look at this before night mare

I hope you like it ! leave me :blue_heart: if you do , and if you have any question let me know.

Enjoy cleaning your messes :joy:
PUTV

32 Likes

@PUTV

Thank you for taking the time to put together these tutorials.

You’re doing a great job of demystifying this process.

3 Likes

Thanks @TinWhisperer Cloud Compare is not in your regular language software , and it is not straight forward, but once you know where to click the buttons it becomes so much easier and it is a great tool.
Glad you like it
keep up the great work , I saw your results ! very good

1 Like

Ditto.

Real world examples are very useful to those like me who are starting out.

2 Likes

Guys do you want a tutorial how to merge scans from POP2 in Cloud Compare ?

it is superior and works fantastic .

5 Likes

Yes, please a tutorial on merging scans would be great.

2 Likes

Ok I am on it , I made some tests yesterday , worked amazing , I merged 3 parts to a perfection , it allows you even export the alignments together as new mesh or merge them into total new object , also have rameshing function to a perfect new mesh, in quads or triangles .

I think you gonna love it @Miamijerry , as it worked so well with human partial scans as well
and so much easier to use as Meshlab that I am not big fan of.

3 Likes

Regarding “Cloud Compare” which file specifically do we open in Cloud Compare and which format do we save the clean file in?

For cleaning I prefer to load *.ply fused point cloud , and save the cleaned point cloud as ply as well .

After I run the PoissonRecon plugin and go to save, I am given the choice of “Binary” or “ASCII”.

They both seem to open in RevoStudio just fine. Does it matter which format?

How can I further edit the texture?

I am saving in Binary mode all the time .
For Revo Studio it does not matter

I will make new video soon about editing of the color data or textures , finishing the new tutorial for merge scans in CC and also open a new youtube channel for this matter … when I am done I will post link .

Ok guys here you go , how to merge partial scans in Cloud compare

5 Likes

Excellent tutorial. I downloaded and installed CC a few weeks ago but was overwhelmed by the array of tools and couldn’t get a grip on how to start. Now I feel armed well enough to get back in there and see if I can clean up some of my older saved nasty scans.

1 Like

Thank you so much Jim , the reason I learned it , I had so many messy scans and nothing else to clean it up as good and quick as with Cloudcompare .
You can use SOR and Noise cleaning as much as desired , it will create new vertices each time , so if you over clean too much , you can always use the early version that was generated .

Thanks
PUTV

1 Like

Yes I agree I found CC very difficult to get started with. Thanks for your help.

1 Like

Thanks @Gbo , happy to help !

1 Like

PUTV - Thank you for this. this should prove very helpful… But I was wondering if there is a way to improve upon this by being able to look at the points captured in each frame of the scan and cleaning them up before fusion… You know, help the algorithm out with some hand processing before things get muddy with overlapping points. Sort of like what we do with revo studio when fusing separate scans but at the individual frame level… Obviously this would be super tedious - but could be a handy way to clean things up in trouble spots.

Is there a way to access the individual frames as scanned from the scanner before fusion?
Thanks,
Frank Wire

1 Like

Hi Frank , there is no way to access single frames as that would be impossible to have a point cloud to edit and you would never really see what is wrong and what is not , the fusion not only remove most of the frames but also fuse the point do it can be exported .
Even if you could export a frames there is no app to fuse it anyway so death end as it would be never merged into anything .

The point capture great if you do now over scan it too much , the example above in the tutorial is for those that over scan their objects too much multiple times , if you going to have scans for merging all you need to do is scan only one 360 degree rotation for each angle and nothing else , then you will have successful merging in Revo Studio , if your scan is overlapped and scanned too many times the point cloud is poor and practically not even usable in Revo Studio , how good is your point cloud so will be your mesh … and nothing can make it better no matter what you do . Pay attention to your point cloud , don’t try to over scan it or capture more at once for best result , go also slower when scanning with POP2 even at 60 and faster with MINI 30 second per one 360 rotation.

Maybe I’m over simplifying things a bit - but I thought each frame of the scan was a miniature point cloud that all gets fused into a larger “complete” point cloud by the Fusing algorithm?

Thanks again!

Yes they are Frank , but hey are not fused and lose points , I understand where you go with it , but the work would be taking enormous time to be complete , you would never know what frame is right and what frame is not until you fuse it one by one… so crazy job to accomplish
sadly we can’t test the theory becouse we have no ability to export it in a proper format .
But Cloud Compare can recognize the lose frames in your scan and eliminate it in seconds … so that is something Revo Studio is lacking at this moment , for that reason the tutorial with the very bad example on purpose to show the potential .

You actually don’t need more than 24 frames to finish the full 360 degrees model , so what I would love to have is scanning per frame each 30 degrees … that would deliver perfection …
But Revopoint scanners are designed to be portable handheld scanners for that reason how more frames per second how better the results in tracking .
You need to see Range 3D scanner in action with 18 frames per second, that is a beast! nothing bad is coming from that device no matter hand held or on turntable .