That is not what the pointcloud simplify is doing or was I intended for , it is actually sort of point cloud “remesher”
Who want to simplify a pointcloud by changing the pitch point distance ? You do that while Fusing , not after fusing .
Setting by point distance will affect the volume and accuracy . I see so many people doing it losing half of the details in process .
The Simplify in Revo Studio is point cloud reducer , lower volume and accuracy , total different function .
The pointcloud Simplify in Revo Scan 5 suppose to “re-fuse” the merged scans into uniform point cloud or based on details , especially when both merged scans was created using different accuracy , but it is not yet set to work perfect and slightly buggy …
If I want less distance between points , I do that while fusing , and it have already the proper pitch point settings values .
@RichardWren overlapped points after merging is a bug , it was already fixed and the bug returns again , there should be no overlapped points after merging .
A little bit of self promotion while showing what my POP3 did (I hope that’s okay! )
After scanning with POP 3, I uploaded the scans into ZBrush and projected the texture and the details into a low-poly model. I had to clean the textures a bit to remove shadows and shinny spots, but it didn’t require much effort. And that’s it!
I can add the texture and details extracted from the scan into my game assets and they look pretty neat and have great performance
In Blender, subdividing the lowpoly model and adding the details from the scan back as a displacement, we get this gorgeous pumpkins:
The round one was scanned with POP2, the other two with POP3, with one difference, the one on the center I scanned it with depth x2. This seemed to offer more details to the texture and the surface, but editing the resulting texture was also harder, and the tracking failed a bit in comparison with a normal scan at x1 depth.
You can see the difference in texture details here:
Hi friends! I have an update on the bell peppers I posted on December! I scanned three more fruits and edited them to be low-poly and made PBR textures with the maps I got from my POP3.
Scanning these was very hard, because they are very glossy and I didn’t want to use spray and spoil them for my lunch
So I scanned them as is. The stem was perfect. The body was very noisy, but the proportions were great so after smoothing it in ZBrush I got these results
Although I’d be curious to see how it could improve with an 8K camera… I feel like POP3 is great for hobbyists, but the texture level is still not good enough for professional work I think…
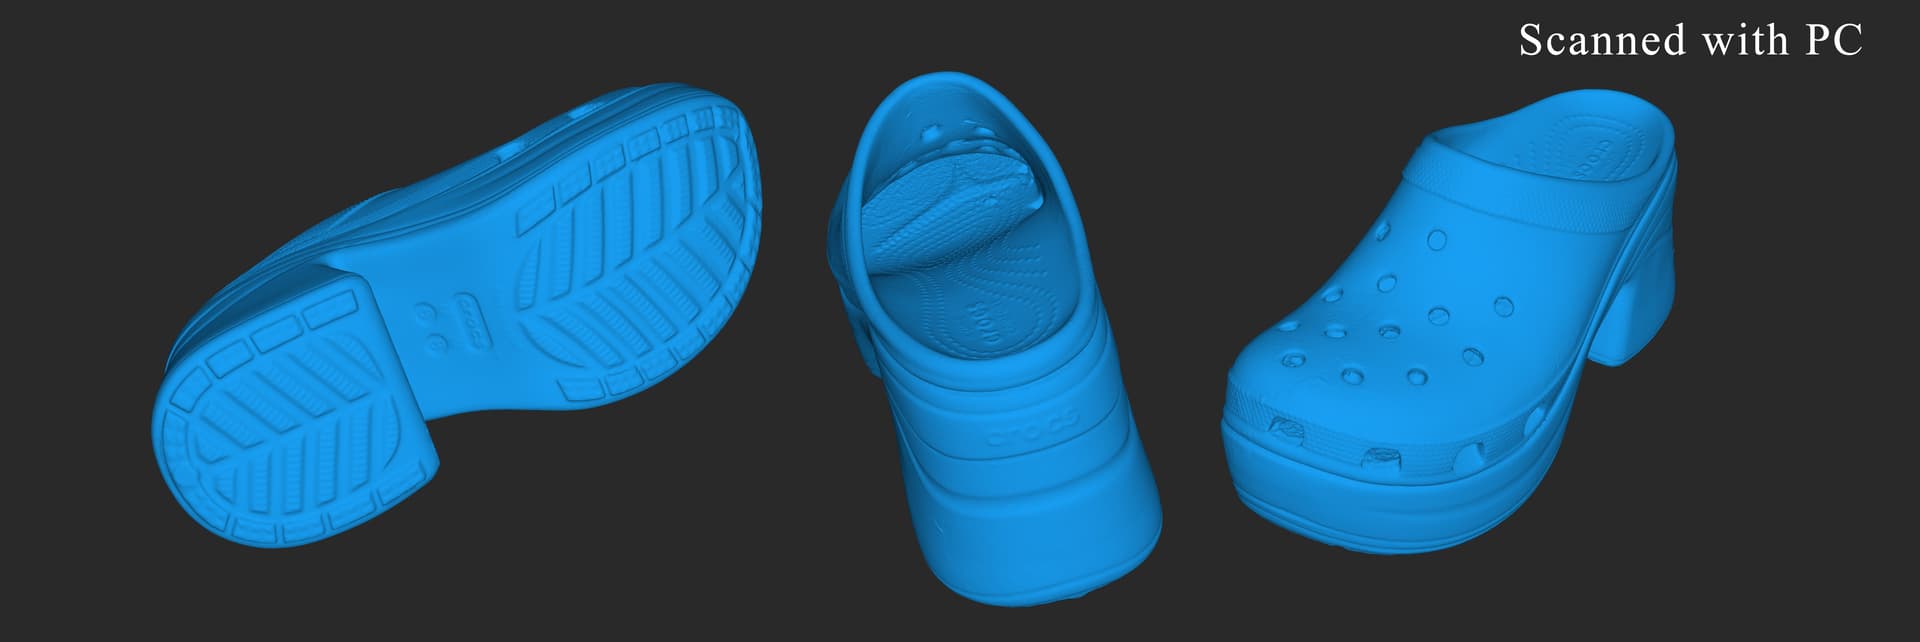
Last night I scanned my new shoes which I adore. It was a complicated thing getting it right.
I started by scanning parts using POP3 and my PC, but I was having difficulty reaching the inside parts, so I switched to the POP3 with my phone and tried scanning a bit more “by hand”.
The hand scanning experience was good, but I missed the option of scanning many parts into one single project (like on the PC version). I was amazed however by how easy it is to upload the scan into the PC from the phone
In the end, the hand scanning was inconvenient because I couldn’t merge the scans into one project and I had to export point clouds and import them again… and I had to use CC to clean a bit the point clouds… but the resulting scan was very good. But it had some artifacts
So I scanned the whole thing for a third time, this time in my PC again, but holding the scanner with my hand and moving it around. The process was much easier (since everything was in the same project) and I was SUPER AMAZED by the fact that I could merge all the 5 pieces at once because I could use that to check is there was any parts I had missed, and I could just go and do one more scan and boom. All done!
This third scan also needed cleaning in CC, and also had some artifacts. Oh and I realized that if I merge more than 2 pieces at once I loose the ability to texture from image (something I hope the devs will look into )
Once I had two great scans with peski articats, I used CC to position them in the same space and direction, and I made a low poly version, and I projected in Zbrush the parts that looked best of each of the scan. Tha’s how I ended up with this beauty:
Newest RevoScan mobile definitely supports multiple scans in a project. In fact I keep forgetting to create a new project and scanning into the last one so I’d appreciate being able to split them back up.
@X3msnake has a Python utility for merging scans into a single project. It’s a lifesaver.
Hi @TheBoatScans ! I updated my android revoscan but the option to scan many parts into one project wasn’t there. Is it only for Iphone? Is there an option I must enable?
Thanks in advance!
Thanks @SphaeroX, I have tried trimming them before merging but then sometimes the alignment doesn’t work because of the missing parts, so I do it very little by little.
I’m glad you like the textures! I don’t have tutorials, I’m sorry but I can share with you a trick I use, and it’s to open the scan in Zbrush and project the vertex color into a new remeshed lowpoly copy of the scan, and I project it say at a subdivision level 8 (depending on the polycount) and then I go to level 4, and in the places where there’s shinny or shadow or ugly colors, I smooth the color only, then go to level 5 and that has already removed most of the ugliness but the higher details remain, so I smooth the color again (a bit less) in level 5, and again in 6, and so on, until I get to level 8 and the shine or the ugly shadows are gone but there is still a good amount of detail left. This works like a charm!
I do the same thing with the texture color, and then I export the resulting clean textures and mix them in Photoshop if needed
If I can next time I’ll take screenshots to show you, but I’m not sure I’ll be coming to the forum much more because of some upsetting things that have happened