Kentacles - INSPIRE Showcase

I recieved an Inspire for Christmas, and have been learning it’s capabilities and creating my own workflow over the past couple days.

I’m a long time 3d modeller (polygon, sculpting, and parametric 3d CAD) as well as some hacky 3d scanning (Samsung Note 10+, kinect, raspberry pi with lidar ripped from robot vacuum, arduino and various distance sensors). I’ve also done an absolute ton of photogrammetry, which was my primary capture tool until now.

The Inspire is already my favorite method by FAR. Speed, ease of use, and quality. And for CAD, not having to worry about scale or inaccuracies in geometry caused by the photogrammetry process is fantastic.

I also do an absurd amount of 3D printing and design around that, so this is an incredible tool for me.

Anyways, on to the results:

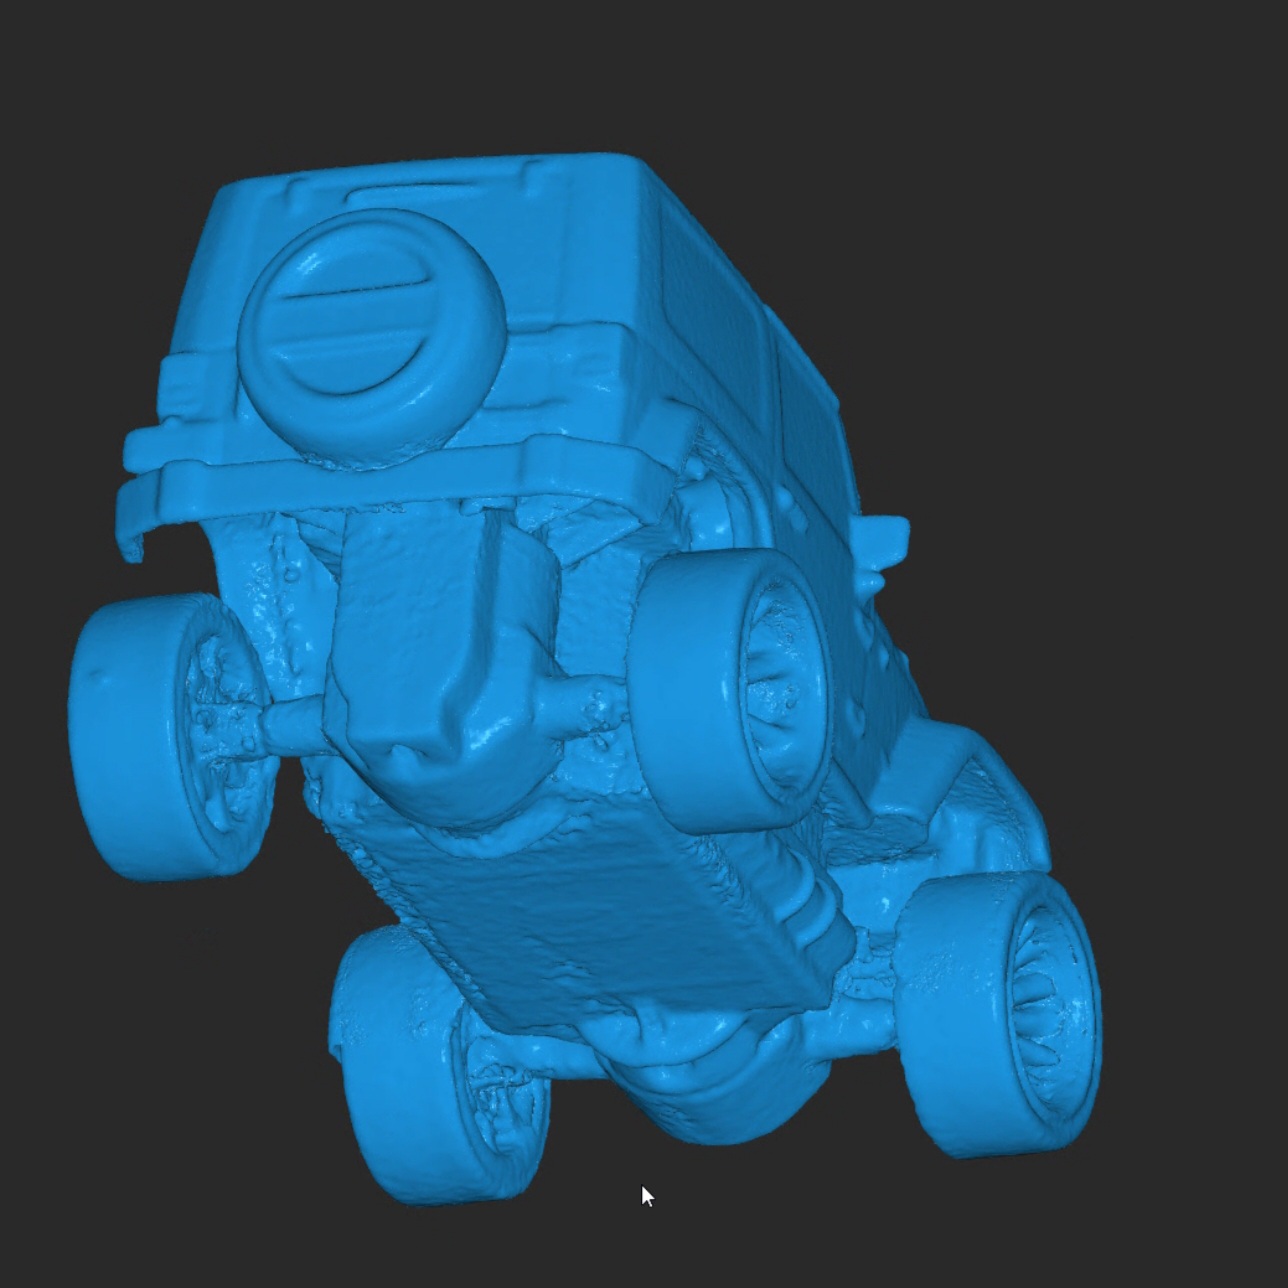
Dremel 7700. Most recent scan. Turntable capture. Used baking flour as matte surface since I don’t have scanning spray. Mixed results, especially caking in crevices.
This is my own attempt at creating my own post-processing workflow. I was able to capture a majority of the fine details, however surface still has some noise.

Souvenir Skull Souvenir from a trip to Mexico. Makes a good benchmark for organic shape capture due to high level of detail and high contrast of surface. Captured in standard mode. (This was my first scan on the Inspire. I didn’t even touch the bust)

Side by side comparison of the skull from above. Top capture is Inspire, bottom is Photogrammetry.
Photogrammetry required an absolute ton of post processing and cleanup, and still shows errors and surface noise. Granted, I don’t have a polarized light setup, but that would cost more than the Inspire…
Photogrammetry DOES provide a fantastic texture, but that’s to be expected from 200 50mp images.

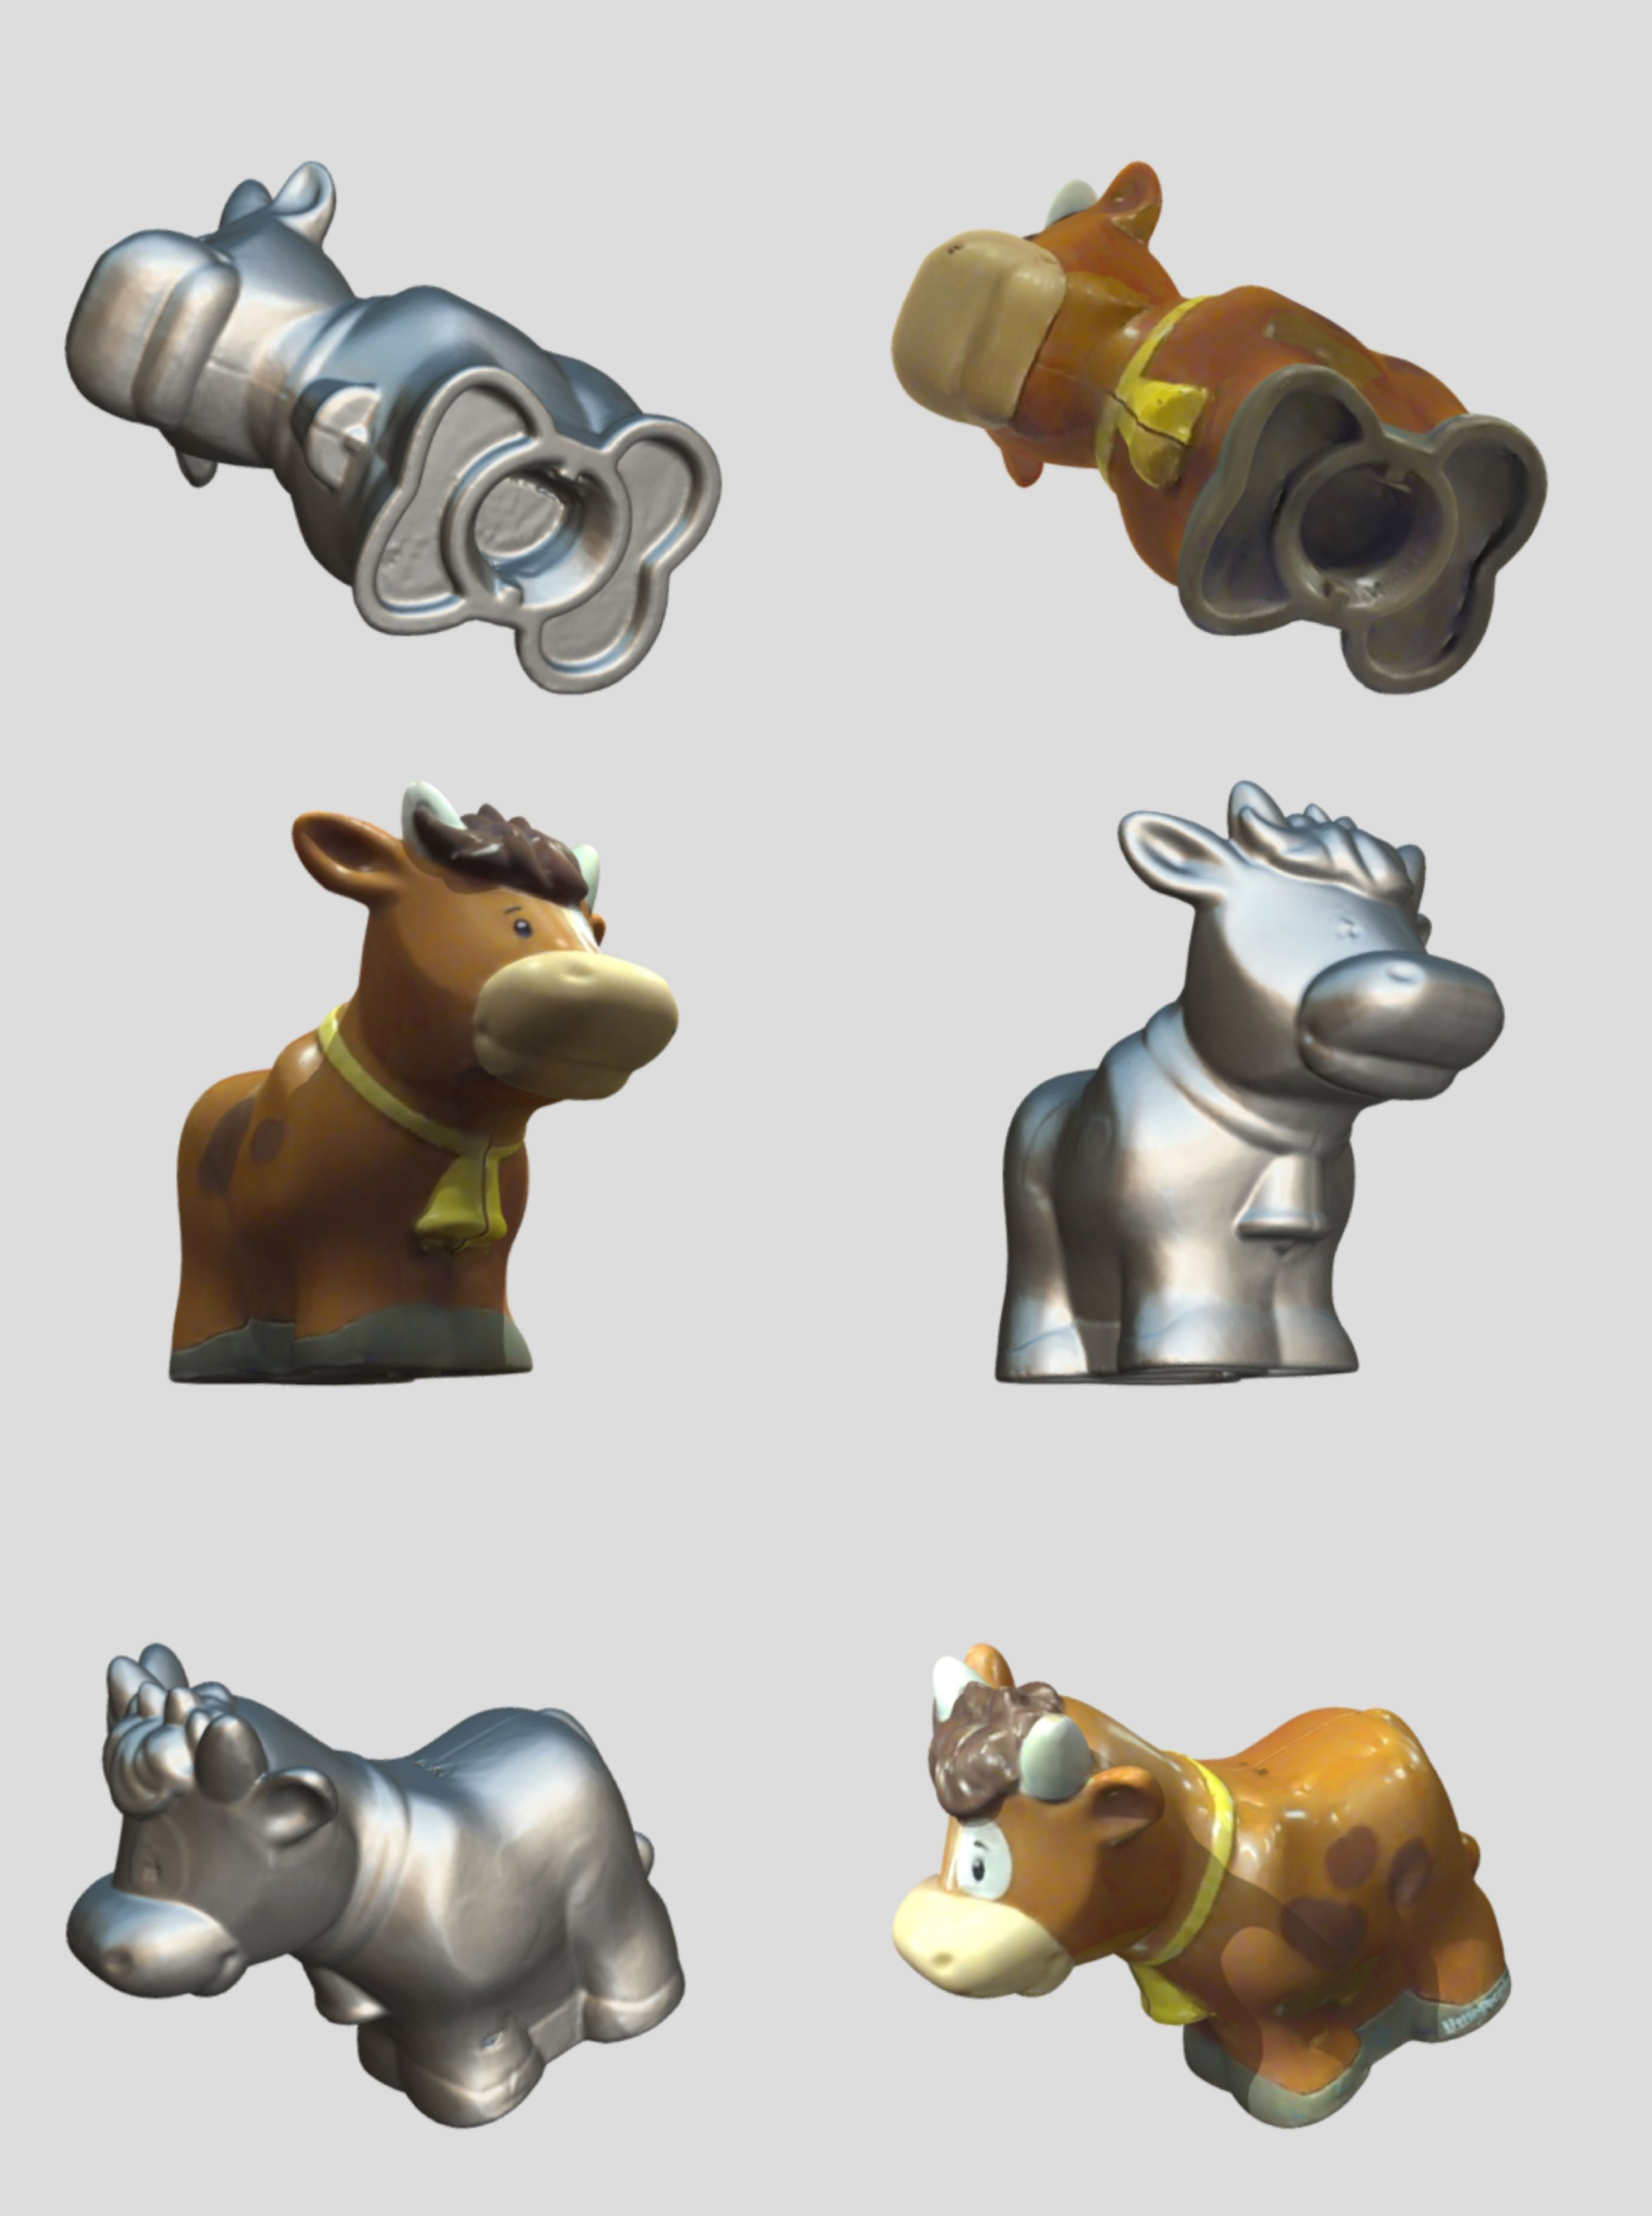
Cow. When your toddler yells “COW!” and puts a cow on your turn table, you better scan the cow. Next step will be 3D printing the cow. Can never have too many cows.

There’s about to be a ton of 3D Scanning in my future. The Inspire is going to have a permanent home in my every day carry. I’m going to to see just how far I can push the limits of this little monster.

4 Likes

Beautiful previews @Kentacles considering you just got INSPIRE

INSPIRE is my favorite to go scanner , never got wrong with this one …

Regarding textures , if you want to have better textures , walk with INSPIRE around the object in place to spin it on turntable ( if you don’t have good light setup )

You can also turn INSPIRE into cross polarization scanner and get rid of all reflections on your objects …
I will write about it soon under the Tutorial section . ( Very cheap solution below $20)

Keep up the good work , looking forward to see more of your scanned results .

3 Likes

looking forward to cross polarization tutorial!! :partying_face:TIA!:pray:

hi! nice showcase!:clap:
here are some tips regarding cheap 3d scanning spray/alternatives

Great showcase, I’m been given free range to purchase an inspire for my Xmas ( a bit late!). Can I ask if you had a toy car lying around to try that? That would be my main use for one at the moment. Thanks again for the post

I might be able to scan a toy car tomorrow. What size? For something the size of a hotwheels, it might be pretty tricky. A larger one though? Probably come out pretty good.

I was experimenting with Foot Spray as a scanning spray today, and chose a Funko Pop Batman since its a dark object with low surface detail. AKA, a scanner’s worse enemy!

I don’t like the one-click results at all, so I’ve been playing with my own workflow and tailoring it on a per-model basis. I’ve learned a ton already, especially on how noisy a point cloud can be.


The surface on these isn’t super smooth, which isn’t a surprise considering the spray, color, and size. But I’m still happy with the end result.

I also scanned a dreamcast controller and a VMU. The VMU is small enough to start to show the limits, but with patience and more learning I think I can get it better. I’ve only been scanning for 3 days, after all.


I think with enough practice and post-processing, small toys can be scanned easily. But for more detail, like a warhammer mini, the Revopoint Mini is likely the best choice.

I went with Inspire due to the price to performance ratio, and it fits the majority of my own needs.

Take a look at the details in mine and see if the Inspire can pull off what you’re aiming for! And once I nail my post-processing, I’ll happy share my process.

2 Likes

@discomonster I scanned a toy dinosaur car. It’s small, approximately the size of a hotwheels car:


I first tried scanning on the turntable, but it wasnt going well. So I hit it with some foot powder and scanned it in marker mode. I did 5 seperate scans (not pause and resume - merging 5 scans) from multiple angles. This had the benefit of increasing the density of the point cloud. When creating the mesh, it let me go as low as 0.07mm at 6 Quality. Though I didn’t go that low due to excessive noise.

Results are below:


I definitely needed to clean up the point clouds more, but this was quick and dirty. If you want to scan this small, you certainly can but I think theres going to be limitations in terms of detail and it will require a bit of manual cleanup. Nonetheless, not bad for something far smaller than the Inspire is targeted towards scanning.

1 Like

@discomonster and since I’m insane and can’t stop scanning, here’s a larger toy car:


I didn’t use markers on this one. 2 scans, feature mode. I used dark object for the underside and it shows in the roughness. I should have prepared the underside before scanning. But for larger toys, yeah no doubt the Inspire is more than capable.

2 Likes

Thanks for taking the time to try that out. They have both come out so well, very impressed.

1 Like

Ongoing learning:
If you’re not happy with the end results from a scan, don’t be afraid to revisit it.

Taking what I’ve been learning the past couple days, I revisited my skull scan and redid the post-processing from scratch. Using the exact same raw scan and point cloud, I was able to dramatically improve the end result mesh (at least to my eye)

The surface details have increased dramatically.

  • The “cut lines” on the brow ridge and lower side of the skull are far more visible
  • The embossed details on the chin and above/behind the temple area become visible
  • The surface texture of the skull becomes visible

Don’t be afraid to go back to old scans - the data is likely there, you just need to coax it out. :grinning:

1 Like

New scan: Bust depicting Sappho of Lesbos

  • Turntable, Feature Scan
  • Approximately 6500 frames
  • Fused at 0.3mm Advanced
  • Texture captured using ambient lighting, not integrated white LED

Bust is around 24in tall. This is my largest scan so far. Very pleased with results, especially considering the glossy surface of the physical item and no surface prep.

3 Likes

Hi Ken , the textured version looks beautiful , but I believe the non textured version is the one that was exported with textures , what is smoothed out by the software for texturing purpose (simplified ), you should export meshed version to show off the mesh and never use the textured obj to show off without textured .

Why ? Because I see the non textured version lost too much details , but maybe because it was fused at 0.3
It is better to fuse in Advanced mode at 0.20 then use smooth option on the mesh or simplify it and then smooth it out on low settings , this way you keep fine details and smooth surface where it should be .

Don’t get me wrong , for presentation of the color version you did wonderful job processing it , texture mapping working better on smoother models .

Keep up the good work and thanks for sharing !

I did indeed share the textured model, however that was because there was almost no visual difference between the mesh model and texture model:


And below is the raw point cloud:

The physical statue is actually very smooth, with a thick clear coat on it. The geometry is actually accurate to the physical item.

What I may do, however, is use the texture to generate a bump map and bake that into the geometry of the mesh in order to increase the surface detail. In that particular case, I’d have a 3D model that exceeds the detail of the actual item scanned!

1 Like

I can see the slightest difference, the normals are smoothed, the meshed more defined edges … I am obsessed with 3D …sorry Ken for my OS3D

Please don’t see it in negative way , you did great scan and I love it , just make you aware of what the software do .

1 Like

There was once a sharping function, it add contrast to the edges , but it is not yet added to the new version … hopefully it will in the future , it would allow you to exchange the smoother scanned objects and add the extra kick to it .

In your case above you can do that , easy with an alpha of the textures … I do that sometimes in Zbrush if needed or requested by my clients.

1 Like

Fun morning scan: Doppel Kek

  • Turntable with Marker Mat
  • Marker Mode
  • 2 Seperate scans

I was going to do a third pass to get a good angle on the filling, but my two year-old decided it was a good snack during the second scan, so the reference model no longer exists :sweat_smile:
I’m going to clean the mesh up a bit in Blender and 3D print it as a toy for his kitchen playset.

3 Likes

Simple object but well done , I mean not simple to scan at all … all the symetrii and fine details … but well done including thr textures !

You should log in to Revopoint Discord server , and post some of your scans under Inspire 3D Showcase section and show new users how to do it right :+1:t2:

Happy New Year :confetti_ball: Ken, to you and Yours!

1 Like

Joined the Discord and shared some scans.

I’m seriously considering writing up a best practices guide on texture capture.

I’ve had people ask on other platforms how I capture rich textures with the Inspire. I think since I’ve been doing photogrammetry for years that it’s become second nature for me. Sharing some of the process steps I use could really help some people.