A video (full disclosure: this will be a sponsored video) with various scans is on the way and will be uploaded on the 3DVF.com Youtube channel: if you have any suggestions of objects you’d like to see 3D scanned, don’t hesitate to ask!
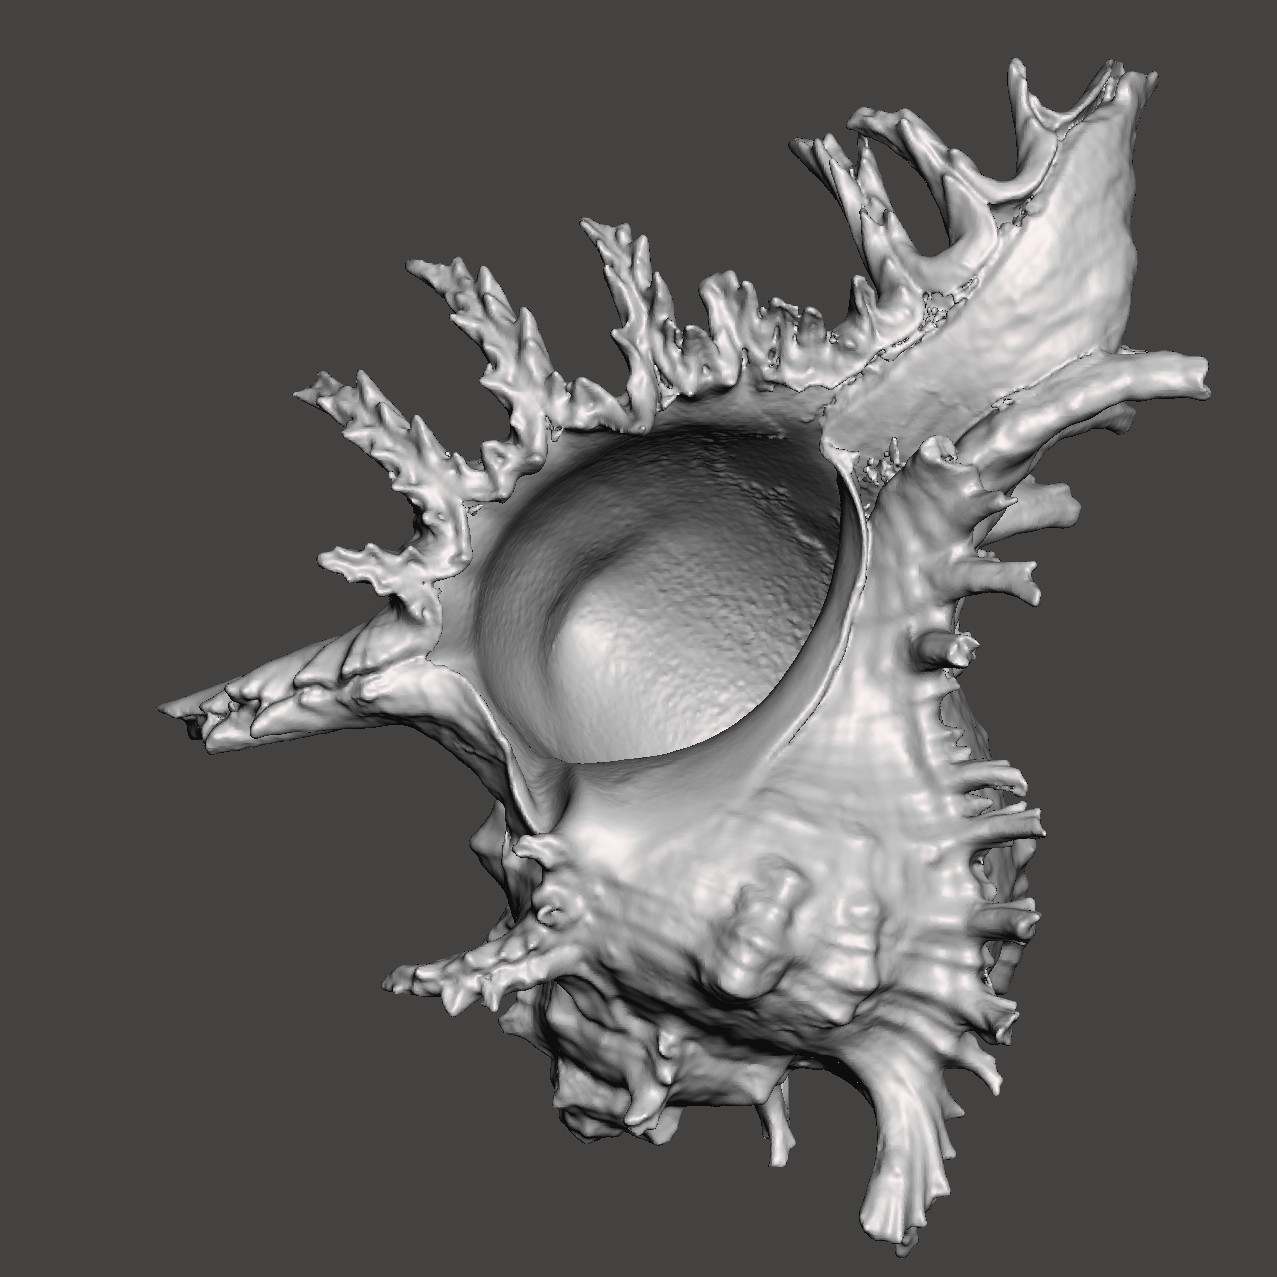
First of all, here is a nice seashell, about 19cm long, 3D scanned using Inspire. Not an easy subjet to scan: overhangs, intricate details, and a few reflective areas. This is actually precisely because it’s not an easy subject that I chose to scan it.
I did a few separate passes, cleaned them up a bit, merged them. Everything was done within Revo Scan. No scanning spray.
The end result is quite nice. The scanning process itself was quite smooth: tracking is reliable.
A crab shell, about 9cm / 3.5 inches in width. I only wanted to scan the outside of the shell, so the undersite is poorly reconstructed (and the support I used is still visible).
Is anyone hungry ?
Here is a nice raspbery tartelette, from a French bakery. With a few pistachio crumbs and lots of cream!
3D scanned using the included turntable, Advanced mode.
And here is some sushi. Definitely not an ideal subject, since basically everything is shiny, but Revopoint INSPIRE still managed to create a usable model.
You might notice some noise/artifacts on the pieces of salmon: look closely, this happend only on salmon fat. Since this substance is both reflective and transluscent, it makes sense. Of course, this could easily be smoothed out.
For this scan I used a technique borrowed from @PUTV : two small LED lights on each side of the RGB camera, in order to get an even flatter lighting. The end texture is quite nice, maybe a bit overexposed on the rice, but that’s my bad, this was done using manual exposure. White balance is slightly off but again, this can be corrected in Photoshop in 3 clicks.
Well done ! If you have too much exposure, after you setup your LED lighting ( plus scanner LED ON) and ready for scanning , click the auto Exposure , let it set up the light correctly and white balance then switch to manual and adjust the exposure as needed … it is hard to scan white surfaces anyway but you going to have better color balance doing so and less washed off colors .
From nature I always scanning with lower Exposure as it is easier later to edit it if needed than over exposed textures .
The manual white balance will be improved soon by the dev.team they working on that already . It is not just a software issue , the hardware is affected by the settings as well so new firmware will be needed to control it correctly in the future … hopefully done for the main release .
Another scan: a celeriac/celery root. No textures, only vertex colors, since this is several scans merged together. About 11cm in width.
Lighting: two small led lights.
The leaves moved a bit while I scanned, but still, the end result is quite nice.
Definitely. I think this could also be implemented in Revo Scan in the future, as an alternate texturing generation workflow, with a few options to control the end result (generate normal/displacement maps or not, for example) and with a polygon count target. One click PBR!
I guess using the turntable at a lower speed can be helpful in such a case ? More frames, more points for the same area, and therefore more colored vertices in the end.
Something that I should also note: even though the vegetable has quite a few areas without much geometric detail, there were no tracking issues. I did place a few small objects on the turntable for one or two specific scans to help with the tracking, but this is as easy as looking on my desk, grabing a few items and placing them around the root. And I did see some misaligned frames during the scan, but the fusion stage always gave me the expected result.
Sadly not with this scanner , the point count is already determined by the hardware of the scanner , you cant add more points or less , the point distance is fixed , and each point is a pixel .
that would be very cool and it is possible …
yes love the whole details on that … simple but showing everything what the scanner can capture .
Another Raspberry tart attempt.
A few artifacts between the berries but nice detail overall. I managed to scan the underside as well: several scans were merged together.
No markers, everything was done using feature mode.
Unfortunately the vertex colors don’t really match from one scan to another, probably because depending on the scan the background was a white wall or (when scanning from above) a wooden desk. I wonder if placing white sheets of papers on the desk could correct this and help the scanner determine the color temperature
In any case, as PopUpTheVolume said above, the team is working on improving white balance, which should solve this kind of issue.
The artifacts come from over scanning the round objects , typical for cases like that , since the center need less compared to outside , not easy unless you can put it on a side while scanning ,…
@PUTV Overscanning might be the issue, but I also feel that I might be picking up artifacts caused by the tiny hairs on the raspberries.
Another scan with a giant macaroon. Not less artifacts, and color rendition is improved: I added a small LED light.
Again, this could still be improved using 3rd party software, I was trying to get a good idea of what can be achieved by beginners, but using CloudCompare to cleanup the cloud, or Meshmixer to remove a few artifacts, would be a good way to improve the 3D model.
Yes that is also possible , when you scan a round object the center get over scanned 360 times until your reach all corners from outside , not to mention the shadow that the raspberries produced …not an easy task , I had the same issue when attempting scanning cake with berries.
I love the second one , the albedo is pure in color , perfect for PBR rendering .
You made me hungry are the raspberries between a macarons?
Tip: when scanning a bowl, fill it up as much as you can, this way the food on the top is picked up by the scanner when scanning the lower part of the bowl, and you can still scan using feature mode even if the bowl itself is symmetrical.
Yes, these are raspberries (and a layer of cream) in the middle of a big macaroon!
I think a workaround for berries would be to hide the center area from the scanner, for example by placing a disk on top of the berries during scans, exept during a pass at the end. Then crop the circle of paper from all the other scans, merge them with the last one. I’ll have to try this out!
Of course, the area in the center is poorly reconstructed since it’s almost hidden from view. Texture isn’t perfect due to automatic white balance (this will be fixed when manual white balance can be set).