Definitely! Don’t forget to share link on other medias , would be very helpful.
Thank you Ken !
Definitely! Don’t forget to share link on other medias , would be very helpful.
Thank you Ken !
In my ongoing efforts to push the Inspire to it’s limits, I scanned a 3D printed bust of Deadpool I printed a few years ago.
My goals:
Scan Settings / Setup:
Methodology:
Enough words. Picture time.
Final Textured Model
Comparison to the scanned object
Glamor Shots
This model is a prime candidate for scanning, considering the detail level and surface finish.
I’m absolutely thrilled with how it came out.
I do wish I’d adjusted the RGB camera settings and used my lighting for texture capture, but this is what experimenting is all about.
(Edit to add: those aren’t scanning aritfacts where the sword sheathe meets the base. The actual printed model has defects there from poor retraction settings. The Inspire captured my poorly tuned print from years ago)
Hi @Kentacles
Good scanning! Thanks for sharing! ![]()
great scan and thx for sharing, both scans and your workflow. But rendering in another sofware like meshlab probably would show even more of details Inspire was capable of capturing. I hope Revopoint soon changes that blue shader as it doesn’t do justice to the scans.
It’s a new day, and I’m here with a new scan.
(ignore the fact I didn’t post yesterday)
One of the things I’m doing with my Inspire is trying different scanning scenarios.
Today’s challenge: Outdoor scan.
Today was somewhat sunny, which made scanning a little tricky. Add on the fact it was cold, and I wanted to get back inside ASAP.
Onto the scan.
Results: The mesh isn’t as detailed as some of my previous scans, which isn’t surprising considering the scanning conditions. On the flip side, the texture quality came out pretty fantastic. The image is not washed out. The statue is meant to look like it was carved from driftwood, so it is intentionally faded looking.
Picture time!
I love that chicken , exactly as you said looks like carved from driftwood . ![]()
In my adventures to scan things smaller than recommended:
This was far more challenging than I’d expected. Turns out a pinecone like this is essentially worse case scenario in terms of object capture. An absolute ton of hard to scan areas that basically had me doing 3D scanning yoga to capture.
The mesh came out alright, but could have used more cleanup. The texture though has me absolutely pleased. Yes there are areas that needed more detail captured, however the color and detail in the good areas has me feeling really good about my process.
Ken you doing really amazing job !
Keep doing … you may win yourself a future Beta tester spot ! ![]()
@PUTV I could only ever count myself so lucky!
But until then I’m just gonna keep on scanning ![]()
So I’ve been busy experimenting the past couple days. The challenge I gave myself:
Scanning objects with a mix of light and dark features
I expected this to be a lot harder than it woundbup being, but the revoscan software did a great job.
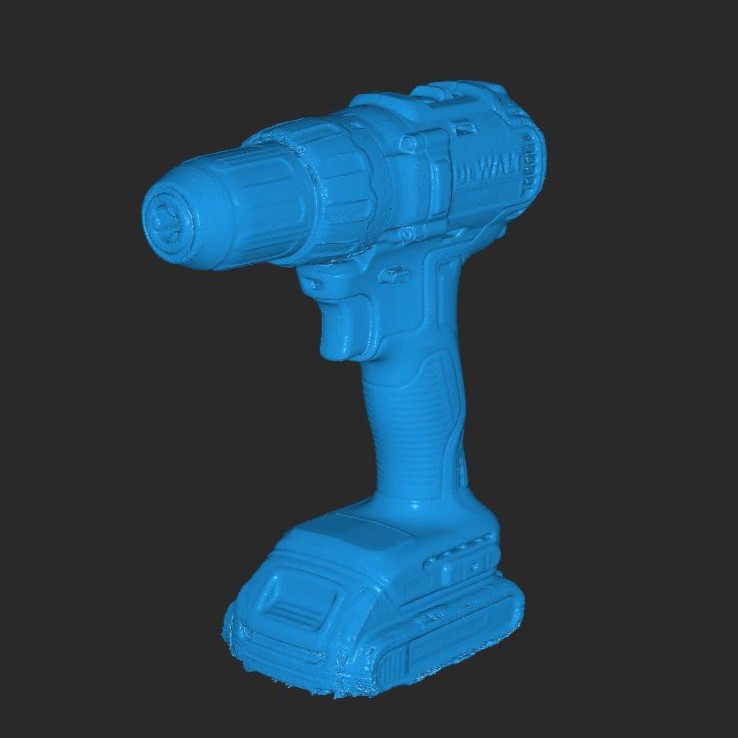
Dewalt Power Drill
This was hard because it is a mix of black, yellow, and reflective metal. I’m EXTREMELY impressed with how well it scanned the metal collet.
1/144 Scale RX-78-2 Gundam Model
Letting my geekiness show here. This is a scale model from my collection I built. This is a shiny object with a lot of white, but the joints and some other features are black / dark grey. It did a fairly good job, especially considering how small this is.
The fist was holding a beam saber, however thats made of transparent pink plastic. Completely invisible to the scanner, though it refracted the IR enough to create a TON of noise in the pointcloud.
Stadia Controller. I wish I’d captured the color data as well. The controller body is pure white, while the sticks and buttons are pure black. It did great!
I wonder what I’ll try next?
Who likes Gundam? Me, because I’m a massive nerd.
Decided to scan another model from my collection:
Major caveat: this falls FAR outside what the Inspire is meant to scan. These model kits feature a ton of small details / small elements. (Based on most of my scans, maybe Inshould have gotten a Mini too ![]() )
)
Results a mixed bag. I used a new lighting setup so color capture is fantastic. However the mesh needs a lot of cleanup… a lot of details are lost to the resolution limits of the Inspire. Though I gotta say, I might like the vertex colors even more than the color image texture for this particular model.
What has me absolute SHOCKED is the fact that the Inspire accurately captured the V fins on the head. These are incredibly small parts that end in a sharp point. These can’t be more than a few millimeters in length, but there they are, fully captured to the point.
This was a “for fun” scan I did today, but now I know I have to go back to it and try to really get all the details on this thing.
A couple other scans from today:
This little guy is about 75mm tall by 100mm in legth. Very small. However the Inspire absolutely nailed it.
DSLR I’ve had for almost 15 years now. I used to use it for photogrammetry until my smartphone got to the point it takes better photos now
This thing was hard. It’s pure black, and theres a highly reflective strip on the grip that my foot spray just would not cling to. I need to get my hands on a proper scanning spray. My dollar store foot spray is decent but goes down thick and uneven.
So yeah, I might be hooked on 3d scanning. I got this as an additional tool to add to my 3D printing, CAD, and 3d modeling repertoire, but its become a hobby in of itself.
Hi @Kentacles
Thank you so much for sharing! Your scans are impressive! ![]()
Would you mind authorizing us to use it for brand advertising, like sharing on social media? We will credit it to you. ![]()
@Revopoint-Jane of course! I’ve been sharing them on Revopoint Inspire Facebook Group as well and have given Fay the same permission.
Thank you so much!! I saw your share on Reddit and Discord too. ![]()
New day? New scan!
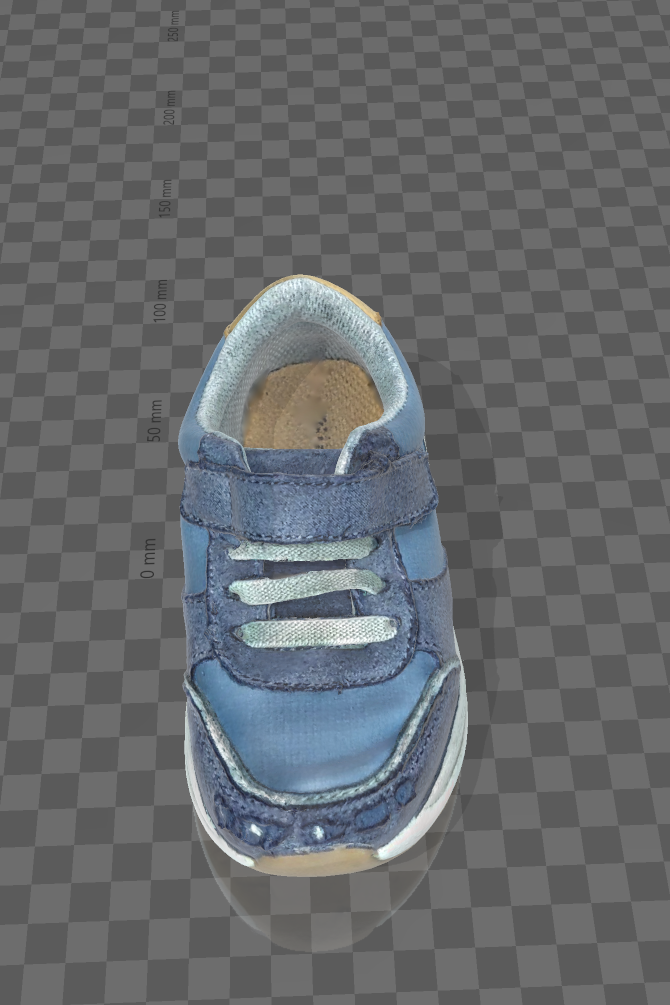
Footwear is a common thing people scan, I’ve noticed. Not sure why, but decided to do my own, but a little different…
Today’s scan:
The results:
As much as I love the Advanced Fusion, the Standard does have it’s own benefits.
It does create more work, however it does a better job at persevering the details of the scanned item. Personally, I think that when it’s combined with the single frame capture, and if you take the time to cleanup the point cloud a bit, you can get great results. It has me wanting to revisit some previous scans to see if I can boost the end results a bit.
Adventures in pushing the Inspire!
Today’s lesson was: The wrong way to do things.
(tl;dr: more frames is definitely not more better if you’re not capturing texture information. adds a ton of noise and slows your workflow down due to cleanup and unnecessary computational load)
This was hard. Pure white body. Black hinges. Accents using transparent ABS with reflective backings. Those backings were the worst thing I’ve come against. When angled just right, this would cause random IR reflections that manifested as what I can only describe as “god rays,” to borrow a term from 3D rendering.
This showcase is becoming both an example of my scans and a log of my learnings. At some point I should really compile the main points I’m learning into a newbie’s learnings post of it’s own.
The final mesh came out better than I expected considering all the “not good” things I did during my process on this one. Goes to show how much Revoscan does on it’s own to counteract the poor results.
I’m going to re-scan this model using Single Frame Capture and compare the two results. I have a feeling it will come out much better…
GPU can’t process all the algorithms, and it is very difficult to to make it . Most 3D software skipping GPU for that reason .
Rendering yes … but processing complicated algorithms is a no no .
And considering how much RAM processing consuming , not having very powerful and expensive graphic card with lots of VRAM will not help you much here either …
Easy to say but hard to make it .
Don’t get me wrong I have my beast with 64GB and 12GB VRAM x 4
But for people with laptops , tablet PC or regular computers it will be not usable .
Looking forward to see your single frame version … not gonna be easy …this model is difficult with all it’s cuts in and out , lots of data and lots of angles needed .
Well this is surprising - Single Shot, while being much faster compute, didn’t produce significant gains.
There are some new issues that are likely due to my missing some points, however the end result just didn’t capture as well as I’d hoped.
Surprisingly, Revoscan still had the highest mesh quality pre-set at 0.34mm. I believe the lack of detail of the actual model (it’s almost all pure white, with some grey, black, and navy blue accents) combined with it’s extremely high contrast may be part of the issue.
The hands, joints, feet, backpack (which I didn’t have on the model on the first scan) and waist, for example, are very dark. The backpack and feet are a navy blue ABS that the scanner just does not like at all, so when the exposure adjusted to capture those points it absolutely blew out the exposure on the white areas nearby.
So, I did another scan in single frame, with the exposure manually set to benefit just the white portions.
Of course, the dark areas didn’t capture at all, but here’s a quick mesh I threw together.
This image below was quick and dirty, single shot, using ~70 captured frames:
While obviously missing a ton of geometry, I think this taught me a valuable lesson: A quality scan relies HEAVILY on a quality subject. Software can only compensate so much.
I need to get my hands on some scanning spray and tackle this again - I have a feeling that an actual high-quality model can be pulled with this subject if I use the right tools.
As an side: The pose was changed because single shot mode on a model like this with repeated features was causing alignment issues - especially the legs. It kept confusing the left and right for one another, and would result in a lovely chimera of a model
This ask for MINI … ![]()
Get yourself Attblime ABX Zero … 2 hours vanishing 3D spray. www.attblime.com
Just frost the surface , do not over spray .
Don’t get so hard on yourself , it is after all INSPIRE , you got above its capacity already …
Haha I wish I had a MINI, but I had to start small and budget friendly for now.
I don’t like limits hahaha. I like to bring hardware to it’s absolute best capability.
I know INSPIRE isn’t a MINI, but I wanna see how much I can close the gap between the two ![]()