Hi guys,
Finally after a long waiting, Revopoint3d 2 scanner has arrived. I state that it is my first 3d scanner.
I am showing you my first test best result, certainly not because it is beautiful, but to ask for your help in understanding my mistakes.
First of all, I tried to minimize harsh shadows by placing the turntable and torso inside a LED-lit photo set.
To position the scanner at an “excellent” distance, the entire torso cannot make it fit all into the frame. So the first round of scanning was placing the torso vertically. Then, go the other turns on the different sides.
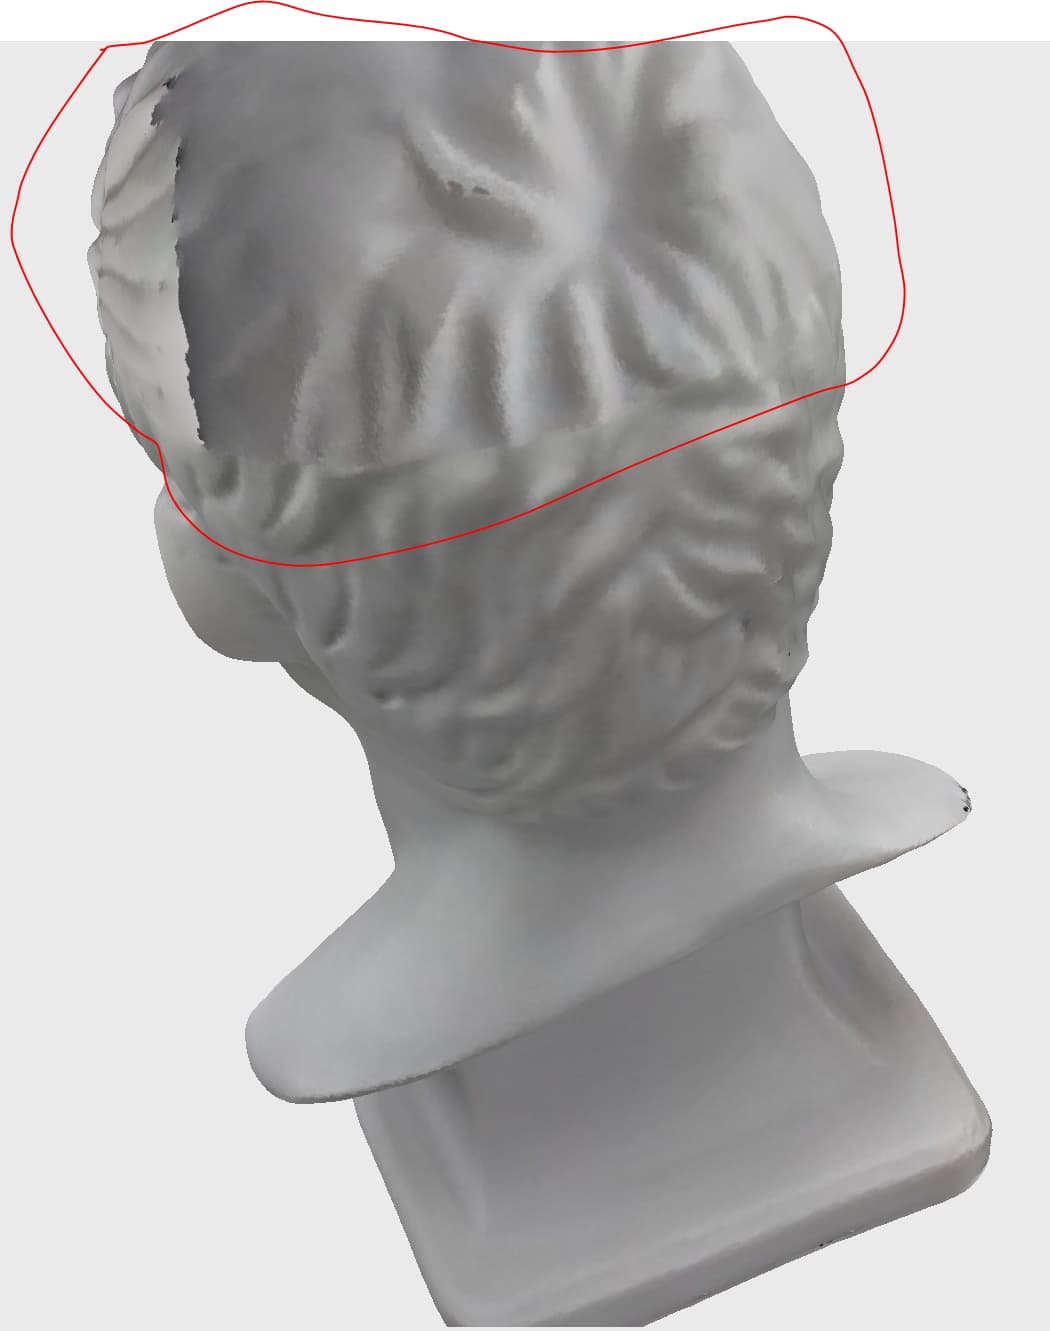
Beyond that, some parts of the mesh are not perfectly closed. As a result, there is an effect of discontinuity of the mesh and non-perfect alignment. I highlight the problem with two screenshots, indicating a red circle in the area with the problem:
What am I doing wrong? Thanks to the scanner, I don’t think I can reach a such result on the first try.
I would be really grateful if you would help me understand my mistake.
Maybe I need to acquire more clouds and merge them later.
Thank you very much for any advice to undertake a journey of improvement and study in this great passion that is 3d scanning.
First of all I would like to see the mesh without textures , your textures will be not perfect since you moved the object and the light changed on different position , resulting in patchy textures . You need to work on your lighting , the software is not ideal to adjust the partial textures correctly but you would be not able to do that in any software if each photo has different lighting , would be heavy manual work .
The bust will fit all at once in feature mode , you will need to adjust the angle of the POP2 , if object do not fit in a mode this means you need to perform separate scans and merge them together later , or use different mode like Face or Head so your scanned object is fully visible in the Depth Cam preview for less headaches afterwards . Especially if you plan to capture textures , you don’t want partial scans , or you need to have perfect light setup from all angles or fit the object at once .
Hi @PUTV,
Thanks for your answer and for your advice.
I come from experience in photogrammetry. I would like to show you the mesh without texture. But I didn’t understand how, once the work in Revo Scan is finished, how can I decide to reload only the data cloud or only the mesh. I tried to do “open,” but at the moment, it does not load the project. Maybe the scanner needs to be connected? I can’t connect it right now.
I am used, in photogrammetry, to reopen projects and be able to view only the data cloud or the mesh or the textured mesh. Any advice is welcome.
I’m very interested in your observation about running multiple separate scans and then merging them together. But at the moment, I apologize. I did not understand with Revo Scan it is possible. Can you point me to an article or a tutorial to follow?
Also interesting is your consideration of the amplitude of the shooting angle. Are you telling me that the various shooting modes have different shooting angles? Haven’t had a chance to try yet or is there a way to vary the camera angle regardless of the mode?
I take advantage of your kindness to ask you one last question: I don’t really know how I have to interpret the view of the depth of field. I see that the areas can be colored red and/or blue. How should I interpret this visual information?
Returning to the initial problem, not avoiding the knowledge of how to do it, I tried to apply some fundamental tricolor of photogrammetry that is overlapping. I, therefore, took another subject that extends above all vertically. I made several loops by raising the tripod, maintaining a fair overlap with the previous loop. It seems to me that there was a good result, even if I observed some artifacts on the texture of which I’m not sure I correctly interpreted the cause. I tried to adopt this approach on a model of the famous character Yoshi of the equally renowned Mario Bros. Below is a screenshot with which you can see the result. Certainly, the plot of this subject is much simpler. While waiting to understand how to execute your advice, I will try to use this approach with the test bust.
For that you need to use Revo Studio , you can open there point cloud data and meshed object and do more with it. If you are happy with your scan I would not open the project again in Revo Scan unless you want to start the scanning over from the beginning , use Revo Studio instate , when you load your meshed object you will see in the right low corner RGB color ic8n next to the House, that is where you enable or disable textures preview on the mesh .
All files are saved separately inside your project folder , fuse is the point cloud data and the others are the meshes , usually the proper obj has mesh or text in their name .
The different modes don’t have a different angles , they have different distances and quality between the object and POP2 , the most detailed is Feature mode for scanning small objects, and the biggest distance is Body mode at 40 cm distance with less fine details .
You want to have the preview in grayscale , no blue or red if possible, some objects will create more red than others what is OK, but make sure there is not white color inside the red area , if you see just red solid color it is ok , if is all blue the object is too far or very light absorbing and you need to increase the gain ( brightness of the Infrared light ) until it turns gray . There are no ultimatum settings for everything , you need to adjust it for each different object each time , but most safe are the number 1 .
You see , since you are familiar with photogrammetry 3D scanning with POP2 works closer with the workflow , you need to capture each angle at 360 degree , how more angles how better result , sometimes it needs just 2 , sometimes 3 depends of each object .
Just practice , words will not make it for you if you don’t get familiar with all the errors you will make while scanning , practice on low settings and once you get a grip, you can move to the final work .
Regarding the bust , yes that was texturing problem with different lights and shadows , you need to work on your light settings … the software will merge together what you provided , same in photogrammetry . Make sure the top and sides provide equal light conditions and you see no shadows created by the light on the object . There is truly nothing else you can do regarding texturing in Revo Scan , it is what it is . However if you do not generate textures inside Revo Scan , you can scan in color and export your obj with RGB color data ( without generating textures ) you will find the new video with the orange on my channel. and how I am doing it for myself . if not Zbrush , you can still use Blender or Mesh lab to perform it , or import it to your fav software that can handle this for you.
Hello @PUTV,
Hello,
Your youtube channel is a surprise. Well done.
I am waiting to receive the CDKey for Revo Studio.
I tried to add the lights, and as far as the bust is concerned, it seems to me there is an improvement. But I don’t understand why if I only visualize the mesh, there are no holes, while if I visualize the reconstruction with the texture, the holes appear. Do you have an idea as to why this is logging in? As you can see at the level of the head and hair, the artifact seems to have disappeared. I don’t understand why you import the ply in MeshLab the texture is not found/loaded.
Before you create textures all you see are RGB color per vertex data on the mesh , that are not textures but color pixels , once you click the texture button , the software creates new UVs and new textures that it captured using the RGB camera , sometimes if you over scan your object too much , it will pick up the wrong one and align it wrong , it is nothing you do wrong , this software is not ideal doing texturing and I can’t help you much here with it . Try to not over lap your scans or scan them over and over again , use just one rotation and stop , less data fast and more accurate results .
You need to learn how to convert RGB color per vertex data to textures , there is plenty of videos on YT how to do it .
Sorry I have not much time here to type it down .
I made one video how to make it in Zbrush , you can check my video on my channel , the one with the Orange .
I think there is bug in the last software as exported meshes in obj with textures do not have UVs for some reason … I need to report it today .
As I told you before , you can export the mesh before it is textured , straight after meshing as ply . It will include the RGB data and you can play with it in Meshlab . If you click the texture button the data is gone.
Hi @PUTV ,
I promise I won’t bother you anymore, at least in the immediate future.
I continue to be perplexed. I am really sorry. I am encountering phenomena that apparently have no explanation.
Since we spoke, I have tried to do some more tests.
I tried to scan a teddy bear (a bear puppet, the classic souvenir puppet), which I expected to be the most challenging test in my expectations and in speed and little care. Instead, it was the attempt that
gave the best result.
I tried to scan a glass with good decoration (good texture, full of references), and in this case, which I expected the simplest, it produced awkward results.
Look at the top left of the image returned from the room and the reconstruction. In the 3D reconstruction the textures are completely overlapped with a sort of overlap and cuts.
I am writing this to have your own explanation or interpretation. But, honestly, I could be wrong. It seems like there are bugs: I don’t know if hardware or software with Revo Scan 4.0.x.
I tried to follow your tutorial on YT (congratulations on your channel, I hope it gets more prosperous). I bought ZBrush, but my version is missing the plugin.
I am attaching some screenshots to make you understand the situation and my concerns.
Also, it’s still unclear how I should adjust the depth of the field box. I am attaching a screenshot. I see areas that come that are colored red inside the imaged object. My difficulty is that all documentation refers to the previous version. I notice an always red background, which does not happen in my software version.
I apologize again and promise not to bother you anymore.
Yesterday I also tried the scan of a brown rubber object, but I don’t understand. Despite being a relatively simple object, taking care not to do too many shots per loop (I stop at about 360 frames per loop), I get unacceptable results with the cloning of the elements, even if there has been no loss of tracking.
Returning to the preview of the rgb camera and above all that of the Depth Camera, which at least in photogrammetry is an important question, from the documentation, not if you refer to the old version of Revo Scan, I find images that all have a red background.
I point out that I use a black background, but I don’t think there is a correlation. As you can see from my screenshot of the decorated glass, I have a black background. Still, above all, I don’t understand what information the software wants to indicate to me for those blue areas on the shooting object that become red (always on the shooting object) in other settings. Also, as you can see from the rewopoint3d documentation, there is no auto function in the Depth Camera window.
You see 3D scanning is different than Photogrammetry how simpler the object how more difficult it is to scan , when you scan with a POP2 , it can only see things in 3D dimension so when you try to scan a cup it see only flat 2d image , there are no features to be tracked , for cups like that and flat simple objects , you need to use marker mode and included plate with the markers as the markers will be your tracking points . POO2 do not cares if there are textures or not on the object , all it looking for are visual tracking of the objects , and if it can’t find it you will get messed up scan
Revo Scan that you need to download from the forum here has a new better Depth Camera preview compared to the old one , the blue indicates there is not enough gain and the red indicates there is too much , a little red or blue is ok , there is no more automatic settings for Depth Camera .
Rubber material is absorbing , so you can’t usually scan it well , and again if the object is simple without extra features you need to use marker mode with the plate .
You actually don’t need the plugin in Zbrush , I purchased the plugin on Artstation as it does great job , you can still use Zbrush original remesher for that and if you like to get the plugin I have here is the link : https://www.artstation.com/a/4714004
Also regarding textures , you will never get perfect results , sometimes it works sometimes it don’t , but since you got Zbrush , you can follow my tutorial and create new mesh and copy the color per vertex data to a new textures that will be much easier for you to edit if you want .
Check my thread , there is a lot of information too that you can’t find in documentation .
so next time you trying to scan an object and you get mandala effect or cloning effect as you saying it means it call for a marker mode becouse it lost tracking and is not able to scan it proper , with the time you going to learn what object can be scan with what mode, just practice , and remember that face and head mode is not just for a face and head , it is also for objects that are the size of face or head , that including a body mode where you can scan bigger objects, of course the details will be less detailed on big objects otherwise your mesh would be enormous to process.
I hope it helps you somehow , if anything else let me know
Hello @PUTV ,
Sorry for the delay with which I answering you.
You are really nice, and your explanations are really very precise and essential. You made me think, in fact, that compared to photogrammetry, I am learning that there are differences and the approach in some cases is different.
Yesterday, I tried the classic orange scan. But even using the plate with the markers, I got an orange with two overlapping layers. Is it probably as you say? Even though it apparently didn’t look like the scanner had lost track? So should I try to scan by applying the markers on the orange as well? The reflections on the various scanning modes about the object’s width to be scanned are also interesting.
I will try to follow you in the ZBrush tutorial. Do you think, for example, that it is possible to remove the markers from the texture, for example, by assuming the orange with the markers applied?
Again my sincere thanks.
I will follow you with particular interest and pleasure.
Hello @codabat yes you need to use marker mode with the orange and any objects that don’t have too many features like for example your glass . You don’t need to out the markers on the orange , but best solution is to change the angle of POP2 , at 45 degree so it is not directed straight to your object , making sure the markers turning red and you keep tracking , when you use marker mode the features of your object do not matter anymore for tracking , it is more then like photogrammetry where the surrounding is moving only around the object what you are already familiar with .
You can remove the markers from your textures in Zbrush by cloning it out , I think another great idea for a mini video tutorial .
if you get overlapped frames , this mean the POP2 lost the tracking in marker mode, or the markers was not visible or visible for short moment by the sensors .
So adjust your angle , make sure as much of the orange is visible ,including frontal markers , and try again . You can also add some markers close to the orange on the plate but not really need to put it on the object , it is too small and you may also get bumps after meshing , try to find your ways with it , it will works as I do it very often .
You do already great progress since you started and it is going to be just better with time .
Best of luck and let me know how it worked for you
P.S When I scan a new object and I am not sure what exactly best mode is to use with , I am testing it at lower accuracy first , and higher pitch point to do it faster , once I find the best solution I am changing my settings to high for final scan . No one object is equal to another and each time you need to think about how to approach it the best way .