Yes, its for your mini too
Yes, it can be used for the MINI.
Hi Selina,
Somehow I had an 1.0.1.17 version installed, did not knew that was even possible to instal mac programs on Win machine ![]()
but reinstalled calibration software with correct version and did the check. It comes to 0.18
You can install MacOS on your Windows device by using virtual machines or VMs only, or use a Mac emulator for Windows.
I am not sure how you do that in first place without the necessary steps.
you need to make 3 tests , the lowest score will be your actual score .
0.1800 is not so good , you will need to recalibrate your device but before that make the 3 tests first, if you get below 0.0xxx your device is fine … anything above 0.1 can slightly affect your results like for example textures , but to affect the scanning of the mesh it need to get way above that .
Maybe revopoint have to post some tips of how they manage to get 0.02 calibration. After several intends i only get 0.045. Maybe room temperature, ligth conditions, temperature of the device, etc
Only 0.0450 ?
That is a perfect calibration score , don’t think that if you get to 0.0200 there is something special awaiting for you or your device scan better than others.
Anything below 0.1 is already great .
Remember that calibration is for fixing your device if mechanical problems accrue due to fall or intensive shaking and not for making it scanning better.
You reached already the perfect value and should not be bothered with lower scores , it is not a competition .
One of my device have 0.0200 score and the other 0.800 and both scanning perfectly without issues .
All scores depends of individual device and not one of them will have ever the same score .
Indeed i see an improvement of quality when i reached the 0.045 value. But the calibration is random reaching values between 0.08 and 0.04. Maibe there is a way for getting consistent lower values and maibe reach to 0.02.
The quality of scanning is different each time as different is your calibration results
There is many factors that can affect that.
For example the proper distance, angle etc…
Scanning at 10cm distance provide different results than at 20cm distance etc … there is not one thing for a perfect result other than learning your new tool.
All you do while calibration is taking a pictures of the board so the depth cameras and RGB can be aligned with each other , the proper distance and steady hand is the key for proper calibration and a little light on the side as you don’t want to do that in dark ambient light.
Not all device will even reach the value of 0.0200 , because things get only bad when it reach 0.5000, anything below that is officially just fine , however I personally prefer to keep it below 0.1000 if possible.
That’s all I have to say on that subject .
Success with the scanning !
Revo_Calibration_for_win_v1.0.1.16b.zip cannot be downloaded.
Get the following prompt from the link:
“No preview available,
File is in owner’s trash”
@PM5F43Q the download link is not active since today .
A new thread should be posted on Monday with new link .
@Revopoint-Cassie should take care of it when she is back.
Question regarding calibration on mini.
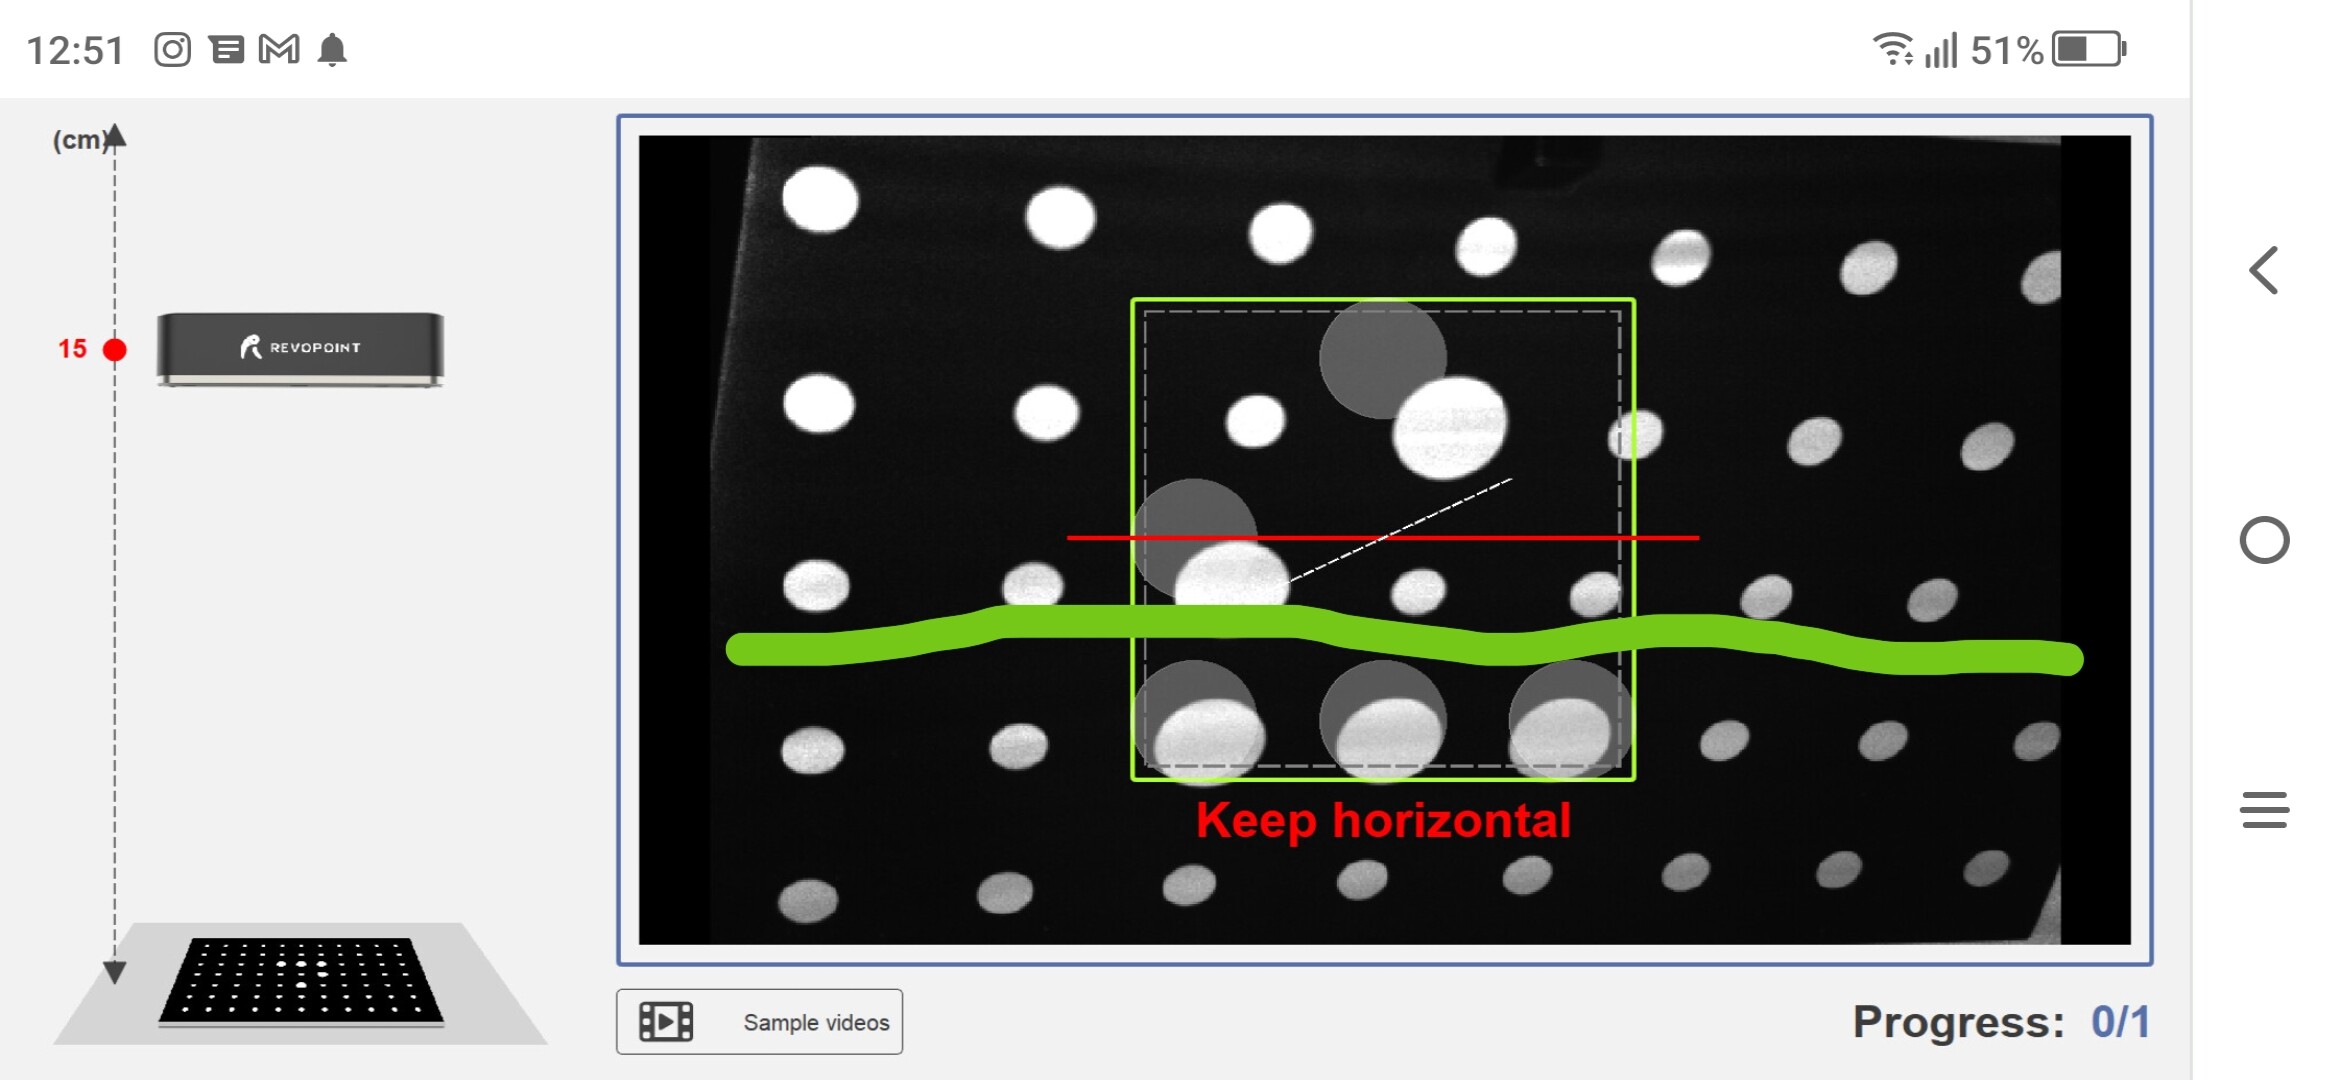
I believe this angle trick was patched or something because when I attempt to angle either of my Minis (I have 2) they both state “keep Horizontal” and I am still forced to use the stand and this is Likely where my calibration gets a little off. I can’t seem to get all the circles lined up.
Best I can do is 0.0715 and 0.0688 for the other.
I know these are still considered perfect but I personally see me messing up in the angle portion of the calibrations.
Any tips and would you recommend a tripod?
Hi Sam,
the angle is tricky for everyone , but the best you can do is focus on the small horizontal dots for the horizontal position of the device , the device is guided by the small and big dots , smaller dots are for the horizonal position and the big dots are the markers that will trigger the RGB to take a picture when the big dots are in the right position , later all the pictures are calculated and the proper calibration values updated .
Some of my MINI are only 0.700 other 0.0200 … same with POP2 , not every device can be calibrated to the lowest level what does not means is bad … once my device was at 2.8000 and I still have no issues with scanning ( the RGB textures was only off )
so having around 0.0600 is just perfect and you should be not bother uncles it get above 1.0000
I tried with tripods, arms and nothing worked so well as a steady hand , additional lighting from a side will help better align the difficult positions .
Remember to always make 3 tests before calibration , the lowest value will be the actual value.
And if you don’t like the number after calibration just start over and don’t update , and most important don’t get yourself driving crazy by the scores becouse not all devices can reach the lowest level but that don’t means they are less good .
Just to confirm, this version of the calibration software works with the MINI?

It will automatically detect and give me a result if I scan perfectly horizontal (calibration board flat, MINI directly above it and parallel to the calibration board) but if I use the included angle bracket (angling the board at 30ish degrees) while keeping the scanner horizontal it will continually stay in the “keep horizontal” warning message.
With completely horizontal (like the POP2 procedure) I get these results:

Picture of setup:

Any advice? I want to make sure i’m getting the most out of my scanner by following the proper procedures!
It is @HardyGIS
The horizontal line is not the horizontal level line of the world as calibration do not use gyroscope , it needs perfect pictures with the small and big dots perfect alignment, it is the horizontal like of the small dots passing through the big dots , don’t bother setting it in a level , pay attention to the small dots row , that is the guide you need to follow , no matter flat or at angle .
Are you sure you attach the angle bracket correctly ?
Actually you don’t need the bracket at all if you set your MiNI at the perfect angle instead .


Ahh, so rotate the calibration plate (or scanner) like this! (rotation around the z-axis along the xy-plane/table) I shall try now.
EDIT:

PUTV as always is a hero we don’t deserve.
I’m going to make a video of my calibration process since it is rather confusing to first timers like me. Thanks again PUTV
Excellent calibration result , you made it, congrats!
and you are more than welcome !
Yes it is kind of confusing for the first time users , but actually more simpler than you may think , once you know what’s going on ![]()
Hello everyone,
If I’m not mistaken, at the moment the calibration tool does not support the calibration board that was included with beta Revopoint MINI units, and that had a different big dot pattern.
Are there plans to either:
- support the calibration board provided with MINI Beta,
- or sell the new board as an accessory ( 3d Scanner Accessories Online | Revopoint 3D Technologies Inc. ), just like you can buy the POP2 calibration board?