No you need to have more accuracy for higher level of pixels, MINI will get you more pixels than Range , each point is a pixel . Scanning at the closest distance will also give the best resolution .
Then you have an object size , for example a scanned coffee mug will have better resolution texture details than a full body scan becouse more more finer details can fit on the coffee mug UVs, so scan your head at 30 cm with Range for the best quality .
2 Likes
That was exactly what I was trying to say, so for Range to have the best pixel quality scan the closet possible to the target. And for Range that is 30cm.
1 Like
Exactly that , you can go to 25 cm as well .
However right now the textures are still at low resolution , so hopefully it will change soon in Revo Scan 5 .
1 Like
Let’s scan a vegetable !
I did three separate scans using Revo Scan, then stitched them using Revo Studio.
I used max settings, which is overkill: the smaller details aren’t really there in real life and are probably (at least in part) just noise.
There are tiny reconstruction issues (stitching line visible in the first picture, artifacts at the bottom of the second one, very small holes detected by Meshmixer) but these can be fixed in just a few minutes using any 3D software.


Fast cleanup, decimation… And we’re done. (the small “blob” near the stem is not an artifact but a a real feature of the subject, so I decided not to remove it)
The process would have been even faster by choosing lower settings in Revo Scan & Studio.

7 Likes
Impressive. Thx for sharing, looking forward to your other future scans🙂
Very nice @shadows44
Tip for you :
The small stitching lines are due to different density of the fused point clouds that was stitched , in the future you may slightly simplify the point cloud after merging , it will equalize the surface before meshing .
I usually do around 1-2% less than the original merged point cloud , and after meshing there are no merging lines .
The difference between scans edges accures due to slightly different distance while scanning , normally I trim the edges before merging as well .
2 Likes
Thanks for the tips! Indeed, I should have simplified the point cloud.
I did trim the edges, but I probably didn’t trim enough.
I have another squash ready to be scanned, I’ll try to apply these tips!
1 Like
Good luck Benoit !
Crossing my ![]()
![]()
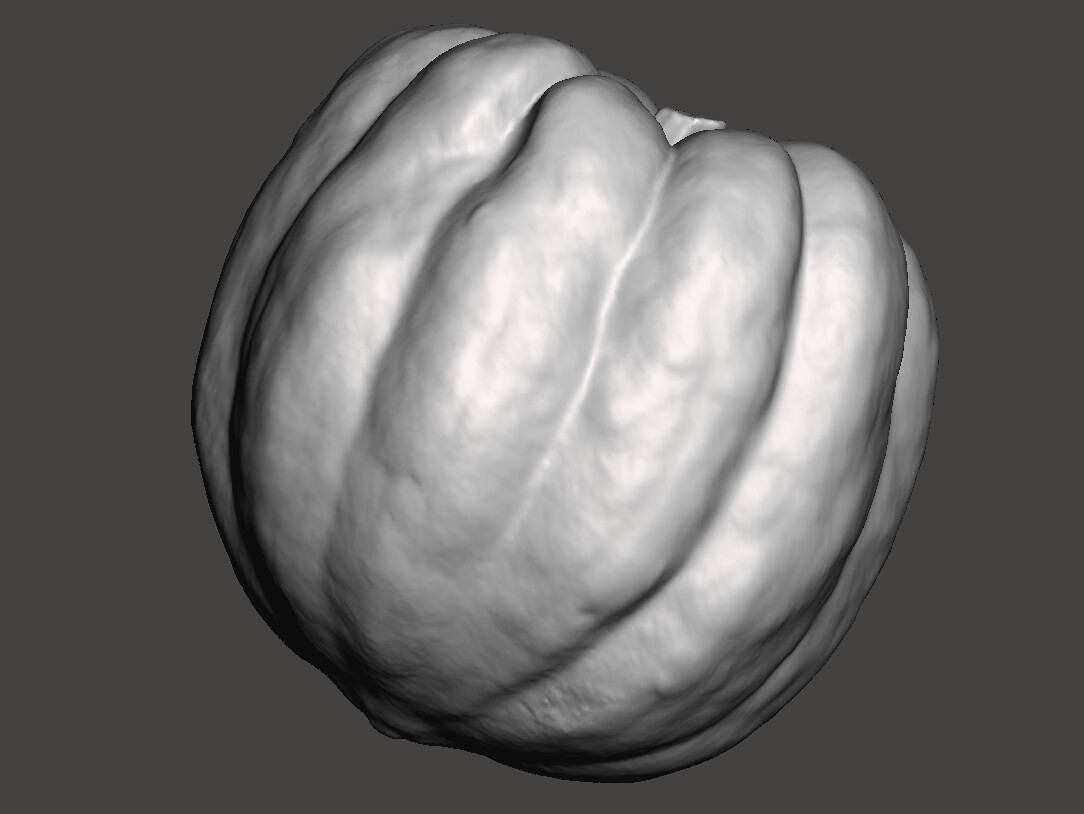
I had to adjust settings several times to get rid of the stitching line, but here’s the scan of the second pumpkin!
(very slight cleanup done to remove three tiny reconstructions errors, it took less than a minute to fix)
There are reconstruction artifacts that can be seen on a specific area (“steps” in the middle of the second picture), but overall, nice scan! I couldn’t properly scan the underside of the stem, but it turned out quite well nonetheless.


7 Likes
Very good job , looks perfect !
And here’s a 3D print of the scan showed earlier!
(FDM/filament 3D printer)
The print is about 16cm /6.3 inches high. I’ll share more footage of this print in my final review.

5 Likes
Another human (processed using batch mode, maximum settings): impressive detail, I even managed to scan the beard and most of the hair (it helps if there are at least a few gray hair).
On the other hand, I got some artifacts: those on the clothes could easily be cleaned up, but it’s gonna be more difficult on the face & nose.
With a few tracking/alignment improvements, this would be perfect.
Next step : I’ll clean the model and print it!


8 Likes
Probably my best human scan so far. A few tiny artifacts on the shirt, and I didn’t manage to scan the hair completely, but I really like the end result.
I really hope upcoming updates can provide more consistent tracking & alignment: when everything goes well, RANGE scans can be really impressive, especially at this price point.
Scanned on PC using body mode with the turntable, Processed using batch mode, max settings, no postprocessing whatsoever.

9 Likes
That is a very good scan Benoit , I see you reached the top quality here.
I know why the artifacts on the lower torso , overlapped cells … next time create some t-shirt folds/ wrinkles in areas like that for better tracking support to avoid that.
But overall super scan and your model have some unique character , very good.
I love scanning and modeling people with unique characteristics.
2 Likes
Indeed, the tracking issue was definitely caused by the lack of geometric details in this area. I’m more at fault than the software on this one. ![]()
By the way, do you have any experience scanning people in Y-pose with Revopoint Range? (to decimate, rig and animate the scan)
It can be tricky for the subject to stay still since the arms are not resting alongside the body. Maybe adding some kind of support would help?
1 Like
We call it A pose, before we used T pose but it interfere with most of the clothing , A pose don’t , and yes it is little difficult as not all people can keep their arms steady for that long , sometimes little stick support is needed for the palms to rest on and best to be painted with acrylic black paint to avoid scanning it .
I do not use scans for animations as they are not the kind files you would normally use , in this case a low resolution quad dummy model is build up ( reverse engineering ) using only quads, then new UVs are created , then it is subdivided to the level of the original scan and then the all details are projected to the dummy , after that the details are extracted in a form of a displacement and normal map and the dummy model is prepared for rigging and grouped/textured , after importing it into the desired software for animation, the textures, displacement and normal maps are loaded and it is ready for animation , posing etc…
That is the shortest version .
Normally the eyes are replaced, the inner mouth is created to allow the clone to be able to talk, smile and having expressions . In most cases the model is scanned without clothing and the actual clothing are reproduced and rigged separately, not over night project , sometimes it takes couple of weeks to be finished .
However there is lots of funky apps that allows you to rig your scans directly without the need of all the professional processing , just search the Google .
Adobe have also some software for that kind of stuff .
2 Likes
Indeed, A pose not Y pose, sorry, the end of the week is approaching and I need some sleep. ![]()
Sure, you definitely can’t use raw scans for animation, and I wasn’t planning to do that. I know a lot of work is involved (and I’ve interviewed studios doing just this, for example French studios specialized in creating game cinematics or digi doubles).
They usually use photogrammetry rigs to create the scans, and I was thinking Range could provide an interesting alternative for some use cases. Which is why I was wondering if you had worked on such a project. ![]()
Yes, Adobe has some nice tools for this kind of use case. Metahumans + NVIDIA Omniverse (with Audio2Face for lip-sync) can be quite fun, too!
2 Likes
That’s kind of job I am doing and I we indeed used photogrammetry based scanner and the editing and cleaning time was too much of waste of time not to mention how expensive the scanning services was to begin with using it , and really limiting licensing that how I discovered Revopoint … glad I did as what Range produced is just exactly what I need for my job , nothing more nothing less .
I checked your website … that’s my world and passion …
Exactly… that are really fun to use tools
2 Likes
What about textures ? Can we aquire texture with a coupled DSLR ? have you try to use it with polarised filter for a cross-polarisation workflow ?
Range can capture textures, but with Revo Scan 4.x they aren’t very detailed and the resolution isn’t very high (4k max).
I shared a few examples above, such as this one :


Revo Scan 5.x should provide improved textures, I’ll share some example soon.
I haven’t tried using it with a cross-polarization workflow, no. What do you mean exactly? Using the CP pictures and manually reproject them on the scan? Or maybe create a rough 3D model using photogrammetry, align it to the RANGE scan, then use the photogrammetry tool to texture the RANGE scan?
2 Likes