Lecce Pastry.
Scanning of a typical sweet from southern Italy, from an area called “Salento.” The dessert consists of an outer layer of shortcrust pastry with pastry cream inside. The dessert is typically well-cooked with a nicely toasted outer browning.
The scanning was performed in Standard Precision mode on a turntable with a rotation speed of 200s and 4 repositionings of the scanner and subject.
The point cloud was fused using Advanced mode at 0.3mm, and the mesh was created at level 6.
The RGB camera was manually set to level 47, while the depth cameras were left on automatic.
The resulting mesh is perfect, capturing in detailed fashion all the surface characteristics of the shortcrust pastry, including the tiny holes and cracks.
The texture is flawless, with vibrant colors that perfectly match the original.


The color rendition is great ![]()
You from Italy ? You made me hungry ![]()
Yes, from southern Italy, a guarantee when it comes to food!
If I start scanning dishes, I can keep going for many years. :-))
I have Italian ancestors on my feather’s side… they moved to Poland where I was born … now in New York …
Yeah do it ! Let’s educate people on real southern Italian food ![]()
You made so great scans , a couple of dishes will be more than welcome !
That is really impressive! That black object with shiny metal parts would be a tough job for many scanners!
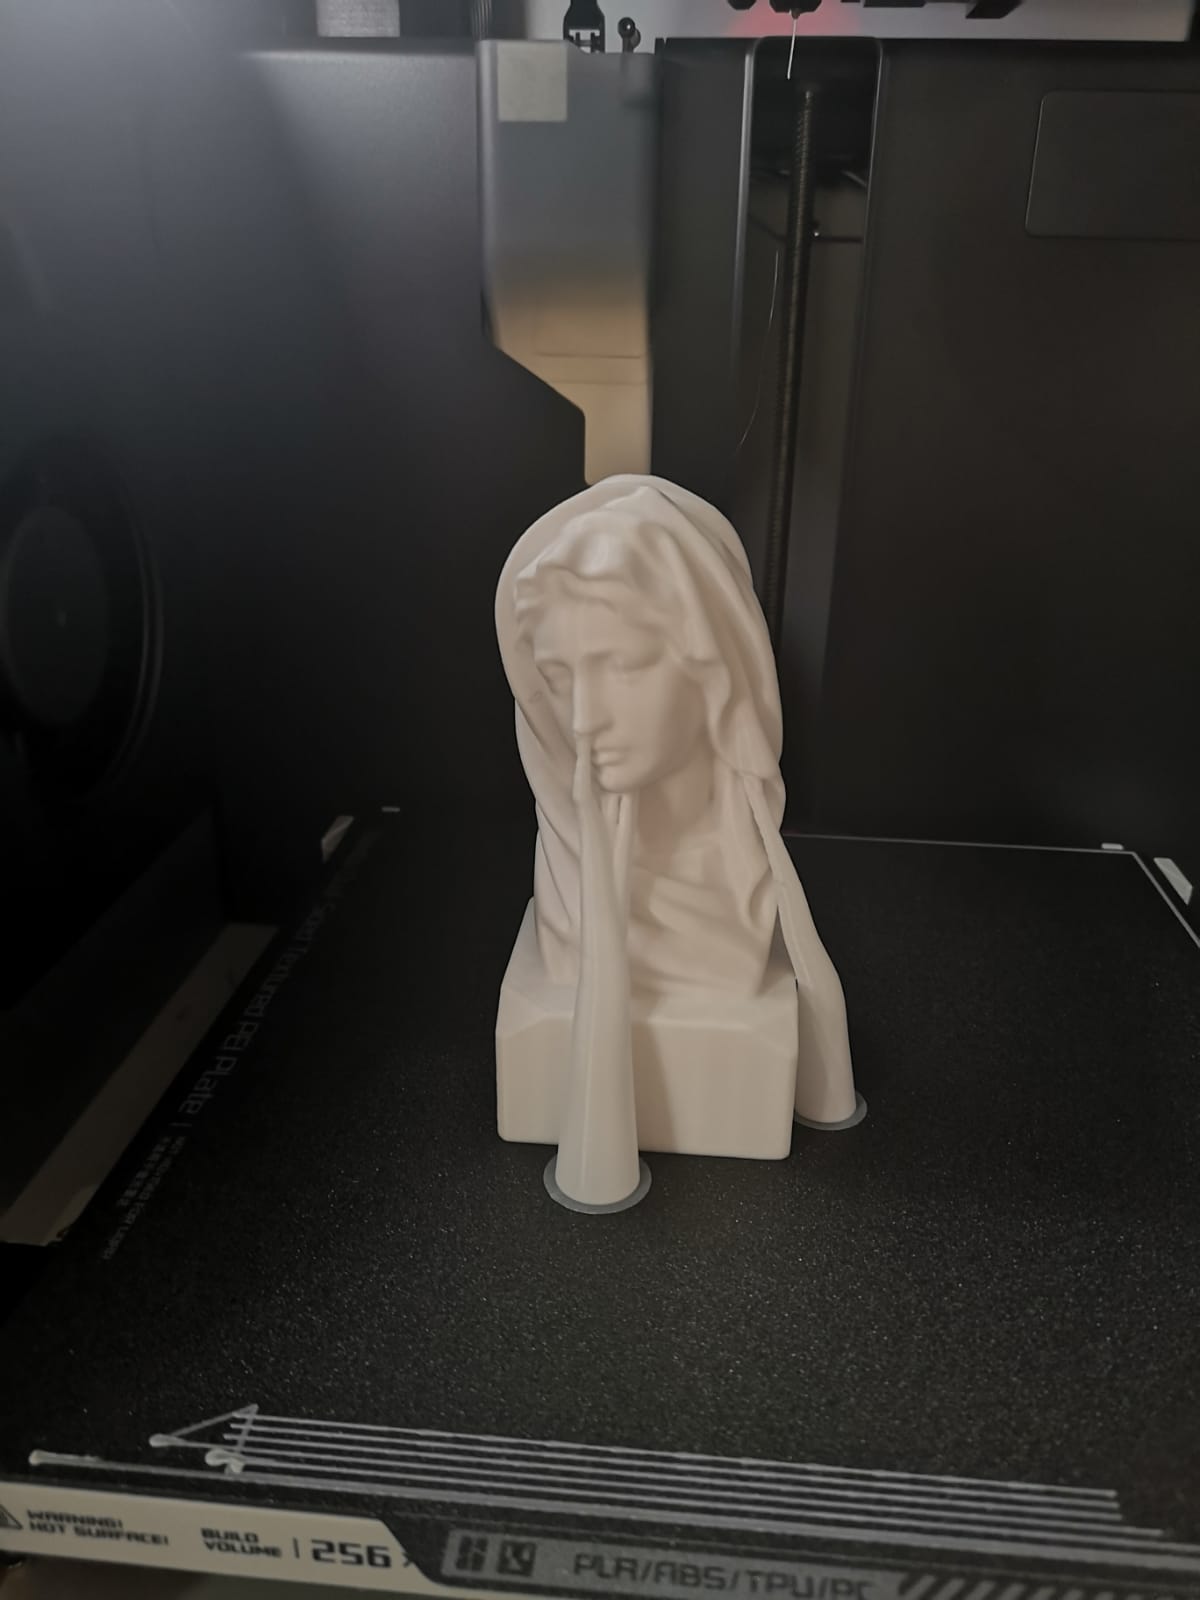
Wooden Bust.
Scanning of a carved wooden effigy with dimensions 60x60x140.
The scanning was carried out using the new Revopoint INSPIRE in Standard Precision mode on a turntable with a rotation speed of 200s and 4 repositionings of the scanner and the subject.
The depth cameras were left in automatic mode, and the RGB camera was set to level 47.
The point cloud was fused in Advanced mode at 0.3mm, and the mesh was created at level 6.
The mesh is flawless and requires no post-production intervention.
The generated file was passed through slicing and printed.
The resulting model is perfectly identical to the original, including the relief of a piece of adhesive tape that I hadn’t noticed was still on the back of the base.
KickStarter link:
https://revo.ink/3rMEC85


Rubik’s Cube.
Scanning of the most classic of puzzles, the famous Rubik’s Cube.
The scan was carried out in Standard Precision mode with feature tracking on a turntable at a rotation speed of 200s.
The entire scan was performed in 3 stages, pausing and repositioning the scanner.
The point cloud was fused in Advanced mode at 0.25mm and the mesh was created at level 6.
The mesh is flawless, and it’s amazing to note that even the thickness of the colored stickers applied to the faces was captured by the scanner.
Even a simple object can sometimes reveal great potential!
KickStarter link:
https://revo.ink/3rMEC85


very nice color rendition and details here Daniele … good job ![]()
Too kind, as always!
A subject that is relatively simple overall, but I liked the idea and it looked nice arranged like that.
Action Figure.
Scanning of an action figure (Hawks from My Hero Academia) with dimensions 220x220x95.
The scanning was done in several stages: first, a partial scan of the entire model, and then scans of the torso, legs, and the torso with the wings.
The wings were later isolated from the model to have only the wings with the correct positioning.
Apart from the partial scan of the torso, which was done in a single phase, the subsequent scans were carried out in three phases, moving the scanner or rotating the model.
All scans were performed on a turntable with a rotation speed of 200s.
The point clouds were fused in Advanced mode at 0.3mm.
The partial scans, except for the wings, were merged in the latest version of RevoStudio5 (5.2.4.872).
The wings were merged with the model manually in Revo Studio 3.0.7.5, which allows convenient fusion of partial parts by manual placement. However, the same operation can easily be performed in MeshMixer.
The generated file was then imported back into RevoStudio5 for mesh generation.
Subsequently, the mesh was oriented (straightened) in PrusaSlicer and is ready for use.
The obtained model is of excellent quality despite the complexity of the original model, managing to capture all the smallest details of the subject, from the jacket buttons to the slightly raised texture of the belt and the texture of the boot soles!
I hope you find the work to your liking!
KickStarter link:
https://revo.ink/3rMEC85


Interesting workflow. I never thought of using the older Revostudio to do compound scans. That’s a neat trick with Prusasliver to do the orientation to xyz too.
Great scan.
Thank you very much. I usually use MeshMixer to manually position non-overlapping scan parts, but every now and then I do it with the old Revo Studio as well. As for the trick with PrusaSlicer to orient the scans, Jermaul suggested it to me, and I must say it’s really convenient!
The old Revi Studio have manual alignment feature so missed in Revo Scan 5 , plus you can turn off the RGB while placing feature points while merging , also missed in Revi Scan 5 .
Absolutely true. It’s a pity, I find the manual positioning function very convenient, as I often need to merge scans that don’t overlap much to avoid the issue of surfaces being damaged by mismatched points. I hope they reintroduce this feature in RV5.
Another thing that could be improved, in my opinion, is the point selection for deletion. If you can’t select only the specific points in certain areas, you can’t remove them, leading to the need for more work in Meshmixer or similar tools.
That why the Advanced mode use in its algorithms.
I saw you have lots of points that did not belonged to the main scan , but was probably too far to be detected and removed … in cases like that I move to CC as the manual isolation or overlapping point detection not always works efficiently.
In case of more complex models it is nesesery to overscan some area to reach all the details .
But it seems that all models fused with setting of below 0.2mm have that issue , why you think we getting all the noises when fusing at 0.1 or below , overlapped points …
Yes, often when I use the standard mode, I encounter exactly this issue.
I’ve never tried using CloudCompare, but I’m curious. Do you happen to have any tips for some introductory tutorial videos?
Duckling with Hearts.
Scan To Print direct.
Scanning of a figurine depicting a colorful duck with various engravings and colored writings on the body, measuring 70x50x60.
The scan was carried out in Standard Precision mode with feature tracking on a turntable at a rotation speed of 200s.
The scan was conducted in a single session with 4 repositionings of the scanner and the subject.
The point cloud was fused in Advanced mode at 0.2mm and the mesh was created at level 6.
The resulting file did not require any cleaning or optimization and was sent directly for printing.
The model is flawless, with the engravings captured excellently even though they are colored in black and are only a few tenths deep.
An example of straightforward Scan2Print.
KickStarter link:
https://revo.ink/3rMEC85


Sorry Daniele I missed your reply , check the forum tutorial section I have tutorial how to clean scans in Cloud Compare …
You see just because you used Advanced mode at 0.2mm don’t means you lose accuracy at all , it just tell the algorithms to ignore the noises that you normally still have to remove when using Standard mode what is usually 50% of a junk and trash data …
I am using now Advanced mode for everything with a perfect results each time and great details , Standard mode don’t give you more details , it give you more noises and junk data …
Battery-Powered Screwdriver.
Scanning of a battery-powered screwdriver with dimensions of 220x160x80.
The scanning was done in Precision Standard mode on a turntable with a rotation speed of 200s.
6 repositionings of the subject and the scanner were performed.
The point cloud was fused in Advanced mode at 0.2mm, and the mesh was created at level 6.
The model turned out to be highly detailed and clean, requiring no post-production work. The details on the rubber and engraved plastics are fantastic, including the screen printing and even the screws inside the holes.
The model, necessary for creating some supports requested by a friend, was straightened in PrusaSlicer, decimated, and imported into Fusion360 to create the parts.
Once printed, the supports turned out perfect in terms of size and fits.
Already having the model of the screwdriver, I created a simple miniature keychain by just adding a ring to the screwdriver’s head… couldn’t be easier.
What do you think?
KickStarter link:
https://revo.ink/3rMEC85


