Introduction
Objects with geometrical features and complex shapes, scan with “Feature” mode directly;
However, when scanning objects like cups or boxes with simple geometric features, please scan with markers. Then select “Marker” mode.
Scanning Methods
There are three s canning methods :
- Stick markers on the surface of an object;
Here follows a car scanning video: https://www.youtube.com/watch?v=2GPHCrbNdhE
2.Place an object on a turntable with markers;
In this method, the relative position of an object and a turntable cannot change.
To ensure that, you shall export several models of an object to merge a complete 3D model.
For example:
a. Raise the tripod to make the POP and markers being approximately 45°- 60°;
b. Adjust an “Excellent” distance;
Note: Check “√" in Clip plane.
c.Select “Marker” mode;
d.Adjust “Exposure” and “Gain” values;
e. Scanning
1st model scanning:
1)Start to scan;
2)Make sure Markers valid (more than five red dots in the center window);
3)Export 1st model;
4)Name the model Cup 1, save in ply., obj., or stl.;
2 nd model scanning:
-
Turn the cup over;
-
Start to scan;
3)Scan 2nd circle;
4)Export the 2nd model in ply., obj., or stl.;
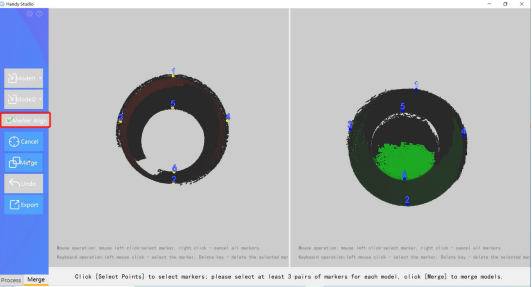
f.Merge
1)Models imported in Handy Studio;
2)Mark on models;
3)Merge;
Note:
1)Scanning repeatedly couldn’t help the accuracy, and only a closer distance can improve it.
2)If necessary, you can scan more than 2 models to merge them into a complete one.


